


MagnusVesper
@magnusvesper.com
Furry, Programmer, Artist
he/him bi 27
he/him bi 27
This must be their home

November 10, 2025 at 5:47 AM
This must be their home
Fun fact: Linux has a second mascot, Xenia, who is a trans fox girl
xenia.efi.pages.gay//
xenia.efi.pages.gay//


September 28, 2025 at 11:56 AM
Fun fact: Linux has a second mascot, Xenia, who is a trans fox girl
xenia.efi.pages.gay//
xenia.efi.pages.gay//
My cat has spent like 1/4 of his life in this box

September 18, 2025 at 10:33 PM
My cat has spent like 1/4 of his life in this box
I recently found BT2.0 connectors, which may work. They're like XT30s but way smaller.
You solder wires directly to the connector instead of crimping them.
For strain relief, I super glue the wires together near the connector. I use super glue you can cure with UV light in a few seconds for it
You solder wires directly to the connector instead of crimping them.
For strain relief, I super glue the wires together near the connector. I use super glue you can cure with UV light in a few seconds for it

September 14, 2025 at 6:05 PM
I recently found BT2.0 connectors, which may work. They're like XT30s but way smaller.
You solder wires directly to the connector instead of crimping them.
For strain relief, I super glue the wires together near the connector. I use super glue you can cure with UV light in a few seconds for it
You solder wires directly to the connector instead of crimping them.
For strain relief, I super glue the wires together near the connector. I use super glue you can cure with UV light in a few seconds for it
This is what the Walmart near my house is like year-round.
At least it makes sense for Walmart to celebrate the US and Texas for enabling their horrible business practices.
At least it makes sense for Walmart to celebrate the US and Texas for enabling their horrible business practices.

July 5, 2025 at 12:09 AM
This is what the Walmart near my house is like year-round.
At least it makes sense for Walmart to celebrate the US and Texas for enabling their horrible business practices.
At least it makes sense for Walmart to celebrate the US and Texas for enabling their horrible business practices.

Too bad you destroyed the research

March 3, 2025 at 6:45 PM
Too bad you destroyed the research

The top comments on that video all made me laugh!

May 11, 2024 at 5:42 PM
The top comments on that video all made me laugh!
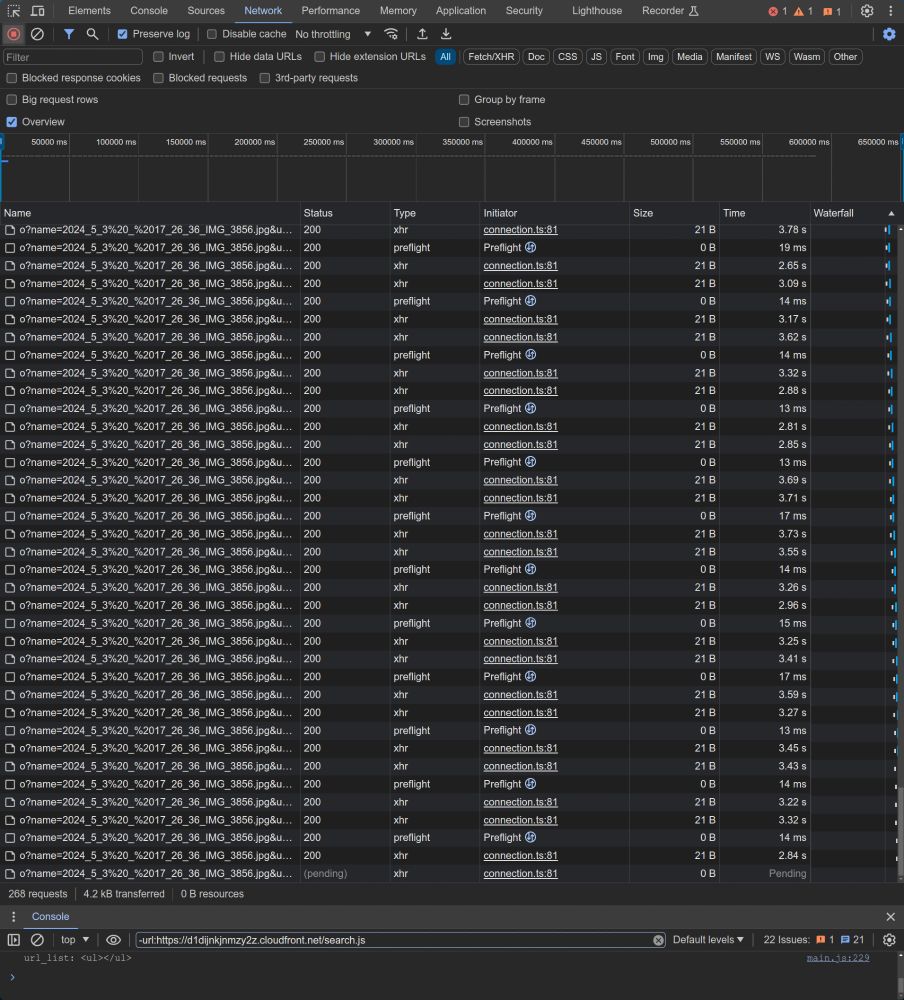
I'm uploading a 1TB jpeg file now.
The network dev tools show the server is accepting a small part every 3 seconds.
The network dev tools show the server is accepting a small part every 3 seconds.
May 3, 2024 at 10:40 PM
I'm uploading a 1TB jpeg file now.
The network dev tools show the server is accepting a small part every 3 seconds.
The network dev tools show the server is accepting a small part every 3 seconds.
Currently uploading this image to the site.

May 3, 2024 at 10:29 PM
Currently uploading this image to the site.

You can see a line where the 2 pieces meet.
If I took more time sanding them or fiddling with print settings, I may be able to avoid that.
But I made these right before TFF and didn't have the time.
I finished the back mesh (pvc w/ dye sub) the day before the con started.
If I took more time sanding them or fiddling with print settings, I may be able to avoid that.
But I made these right before TFF and didn't have the time.
I finished the back mesh (pvc w/ dye sub) the day before the con started.

March 22, 2024 at 8:39 PM
You can see a line where the 2 pieces meet.
If I took more time sanding them or fiddling with print settings, I may be able to avoid that.
But I made these right before TFF and didn't have the time.
I finished the back mesh (pvc w/ dye sub) the day before the con started.
If I took more time sanding them or fiddling with print settings, I may be able to avoid that.
But I made these right before TFF and didn't have the time.
I finished the back mesh (pvc w/ dye sub) the day before the con started.
I didn't glue that part to the head either.
I designed that piece to be lined with small holes thah I used to sew it to the fur.
The ridges are to make sure the led piece stays aligned. Before I added them.
I designed that piece to be lined with small holes thah I used to sew it to the fur.
The ridges are to make sure the led piece stays aligned. Before I added them.

March 22, 2024 at 8:37 PM
I didn't glue that part to the head either.
I designed that piece to be lined with small holes thah I used to sew it to the fur.
The ridges are to make sure the led piece stays aligned. Before I added them.
I designed that piece to be lined with small holes thah I used to sew it to the fur.
The ridges are to make sure the led piece stays aligned. Before I added them.
Why magnets?
That let me make it in 3 parts:
The piece with the eye mesh, the piece with the leds, and the piece that's attached to the head.
So only the least fragile part is attached. If the leds or eye mesh break, I don't have to do damage to replace them.
That let me make it in 3 parts:
The piece with the eye mesh, the piece with the leds, and the piece that's attached to the head.
So only the least fragile part is attached. If the leds or eye mesh break, I don't have to do damage to replace them.


March 22, 2024 at 8:34 PM
Why magnets?
That let me make it in 3 parts:
The piece with the eye mesh, the piece with the leds, and the piece that's attached to the head.
So only the least fragile part is attached. If the leds or eye mesh break, I don't have to do damage to replace them.
That let me make it in 3 parts:
The piece with the eye mesh, the piece with the leds, and the piece that's attached to the head.
So only the least fragile part is attached. If the leds or eye mesh break, I don't have to do damage to replace them.
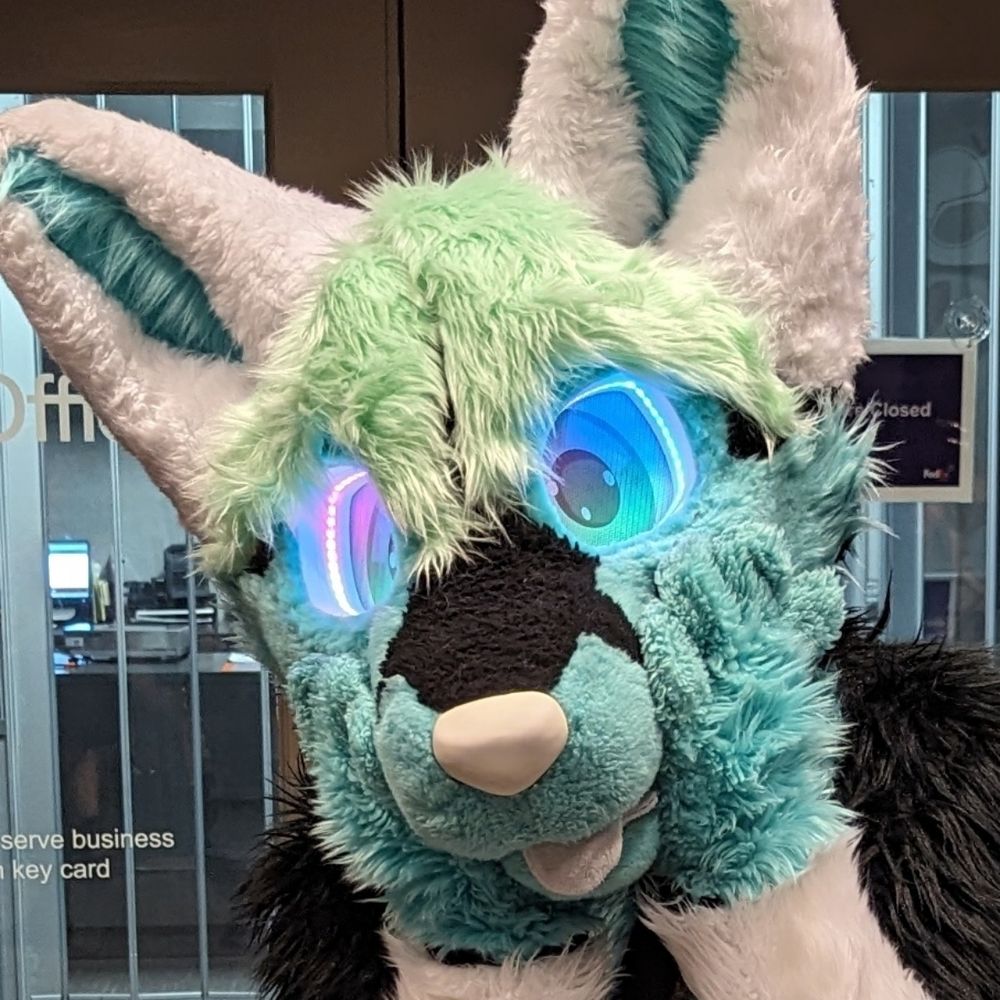
The process of making my new fursuit eyes.
The LEDs and magnets are inside the eye, done by pausing the 3D printer and dropping them in.
On the old design, those were just glued on.
The LEDs and magnets are inside the eye, done by pausing the 3D printer and dropping them in.
On the old design, those were just glued on.


March 22, 2024 at 8:31 PM
The process of making my new fursuit eyes.
The LEDs and magnets are inside the eye, done by pausing the 3D printer and dropping them in.
On the old design, those were just glued on.
The LEDs and magnets are inside the eye, done by pausing the 3D printer and dropping them in.
On the old design, those were just glued on.

March 17, 2024 at 3:46 AM
