I Do Computer
banner
i-do-computer.bsky.social
I Do Computer
@i-do-computer.bsky.social
//I Do Computer 🖥️
//Vanilla Sucks 🎱
//VGN 🌱
//Mental Health

Reposted by I Do Computer
Kaspersky has open-sourced hrtng, its internal IDA Pro plugin used for various malware reverse-engineering tasks

github.com/KasperskyLab...
GitHub - KasperskyLab/hrtng: IDA Pro plugin with a rich set of features: decryption, deobfuscation, patching, lib code recognition and various pseudocode transformations
IDA Pro plugin with a rich set of features: decryption, deobfuscation, patching, lib code recognition and various pseudocode transformations - KasperskyLab/hrtng
github.com
December 5, 2024 at 3:57 PM
Reposted by I Do Computer
“billionaires like Elon Musk and Mark Zuckerberg and Jeff Bezos control all the platforms that we use all the time and where we have all our data.... I want to basically make it so that the users...—everybody else who isn't one of these really rich tech billionaires—has a bit more power”

Yes!!
December 3, 2024 at 7:36 PM
Reposted by I Do Computer
How to Use Microsoft's Copilot AI, and 10 Things to Try Right Away
www.pcmag.com/how-to/how-t...
How to Use Microsoft's Copilot AI, and 10 Things to Try Right Away
Copilot and ChatGPT share a lot of similarities, but Microsoft’s chatbot offers certain advantages. Here’s how to take it for a spin and check out its most compelling features.
www.pcmag.com
November 26, 2024 at 12:23 AM
Reposted by I Do Computer
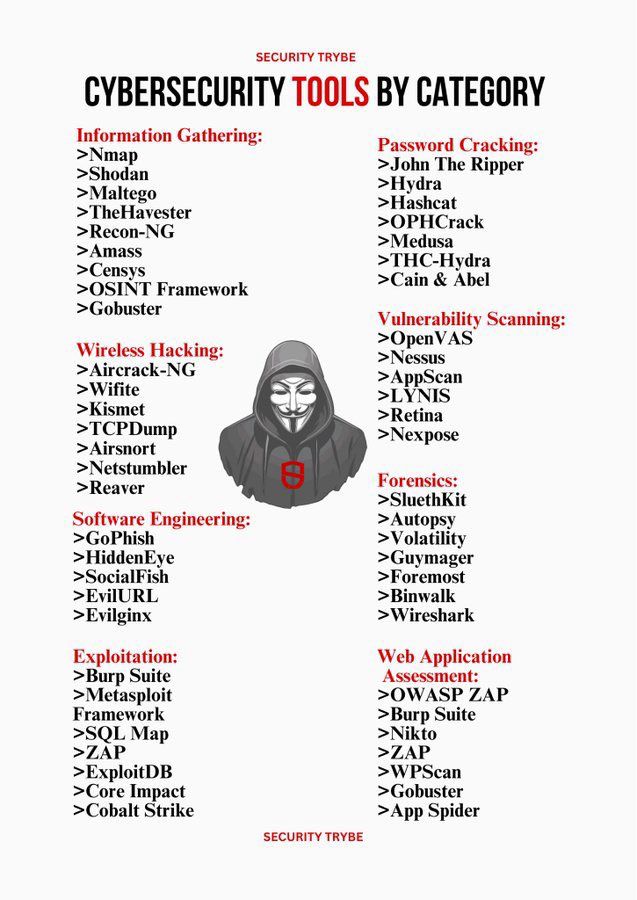
#Cybersecurity Tools by Category. Thoughts?
November 30, 2024 at 5:53 PM
Reposted by I Do Computer
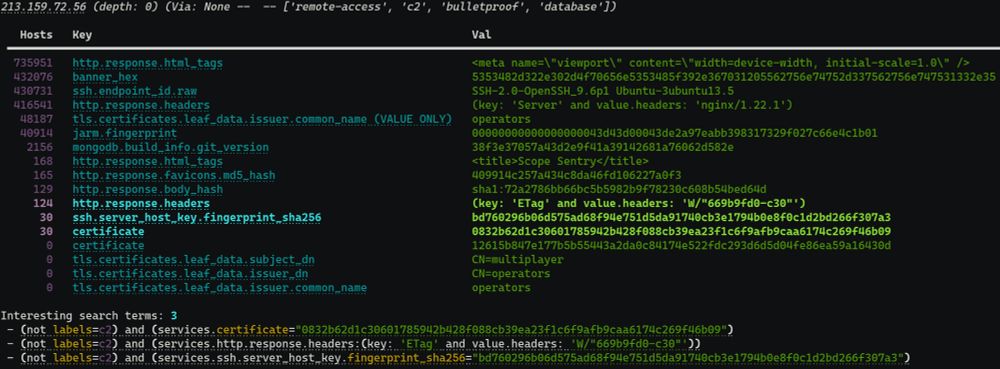
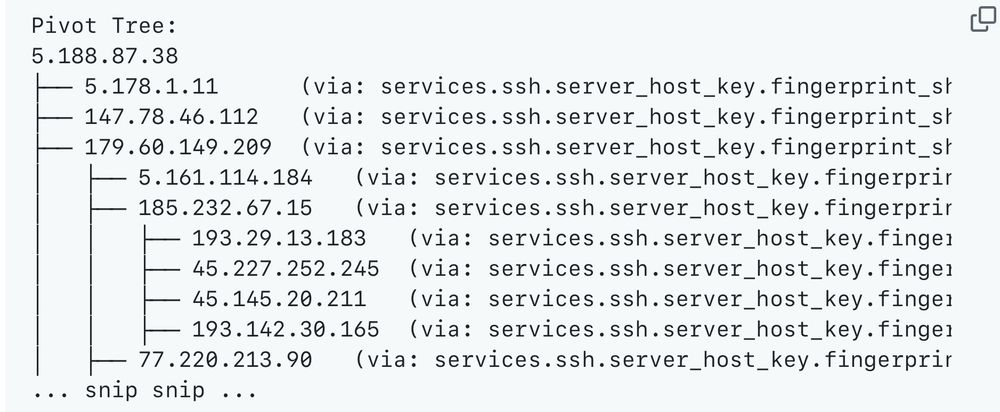
Very cool! This will save threat hunters a lot of time.
We released Censeye today, an open source CLI tool that makes it dramatically easier to pivot and find related assets when threat hunting on Censys instead of manually checking for potential identifying characteristics like an SSH host key. github.com/Censys-Resea...
November 27, 2024 at 6:20 PM
Reposted by I Do Computer
Building a Virtual Ethical Hacking Home Lab — Part 4: Attack Machine Setup
Building a Virtual Ethical Hacking Home Lab — Part 4: Attack Machine Setup An interactive guide for building your very own ethical hacking home lab using VMware Banner background by Logturnal on Freepik | Hacker cartoon by Designer29 on Freepik Banner Inspired by: David Varghese Module Content 1. Download Kali Linux Image 2. Create Kali Linux VM 3. Install Kali Linux 4. Post-Installation Configuration In this module, we’ll install the Kali Linux VM as our dedicated attack machine. Unlike the victim VMs from the previous module, which were preconfigured, Kali Linux requires a more detailed setup process. This involves creating the VM from scratch and configuring it step by step. Given the complexity and time involved, I’ve dedicated an entire module to ensure the process is clear. Let’s dive in and set up our attack machine! Download Kali Linux Image Get Kali from the following link: Download Kali ISO Download the 64-bit recommended installer . The image is 4 GB in size, so it will take some time to download. 📝 As of writing, the latest version of Kali Linux is  2024.3 . You will have an  .iso file saved on your computer after download Create Kali Linux VM Launch VMware workstation and click Create a New Virtual Machine Select Typical (recommended) and click  Next Select Installer disc image file (iso) and click Browse to select the image fine we downloaded earlier. Select the file and click  Open Click Next Select Linux as the guest operating system. You can leave the version at  Ubuntu Give the VM a suitable name — here I gave it the name Kali . Browse to the location you want Kali VM to be and click  Next . Increase the disk size to 50 GB and select Store virtual disk as a single file Select Store virtual disk as a single file. Click on  Finish Install Kali Linux Select Kali from the sidebar and click on Power on this virtual machine From the installer menu, select Graphical install Select your Language, location and keyboard layout. Enter a name for the VM. You can use any name here. 📝 The hostname is used to identify the system on the network. The hostname can also be changed after installation. Leave the Domain name input blank and click  Continue Enter your name. 📝 This is what will be shown on the login screen. Create a username 📝 The username is used to create the home directory for the user. All the user-related configurations are stored in this folder. Here, I gave it the name attacker . Enter a strong password. Re-enter the password in the second field for confirmation and click on Continue . Select the appropriate clock for your location, then click  Continue Select the drive ( sda ) and click Continue . Select Guided — use entire disk and then click Continue . Select the option: All files in one partition and click on Continue. Select Finish partitioning and write changes to disk. Then click on Continue . Select Yes and click  Continue After the base system installation is complete, we need to choose the desktop environment that will be installed. I have selected GNOME for installation. 📝 Speaking of other options, the default is XFCE; it does not look as pretty as GNOME, it is much lighter and should have better performance. KDE Plasma is the fanciest with a lot of bells and whistles. I would only recommend KDE if you can assign 2 cores and 4 GB RAM for this VM. Once the desktop environment is selected, click on Continue . The installation will take some time. Select Yes and click Continue . Select /dev/sda and click  Continue Click Continue to reboot the system. After reboot, we should see the Login screen. Click Enter to log in. Enter the password that was configured during the installation. Login to the Desktop. Post-Installation Configuration Kali Linux installer can detect when it is run from a VM because of this it automatically installs Guest Add-ons. 💡 Press Right Ctrl+F to enter Fullscreen mode. The VM should scale to fill the entire screen. Press Right Ctrl+F again to exit Fullscreen mode. From the dock at the bottom of the screen. Select the Terminal. Run the command: ip a We can see that the Kali VM has been assigned an IP address from NAT network adapter —  192.168.199.130 from the address space 192.168.199.0/24 The VM should be able to access the internet as well. Run the following command to fully update the system: sudo apt update && sudo apt upgrade ⚠️ This may take a while depending on your internet speed Once the sources have been fetched, we will be asked if we want to continue. Enter Y and then press Enter to start the update. After the update is complete, run the following command to remove the unused packages: sudo apt autoremove 📝 The  .iso file that was downloaded to create the VM can be deleted now 🚮 if you do not plan to store it for future use. ⚠️ Sometimes, your Kali Linux machine might show black screen on boot, this issue typically occurs after updating the VM. To fix this, forcefully power it off and start it again. Sometimes, it takes up to three attempts of power off and on again to get the issue fixed. In the next module, we will start conducting reconnaissance on the victim computers as though we’re preparing to attack a real machine. Previously on this series: Part 3: Victim VMs Setup Building a Virtual Ethical Hacking Home Lab — Part 3: Victim VMs Setup If you liked what you just read, consider: ◆ Clapping for the article (you can clap up to 50 times) ◆ Dropping a comment to show your support ◆ Sharing the article with others who will find it useful ◆ Follow me on medium and  LinkedIn ◆ If you’re following the setup for this lab and you come across any technical issue, feel free to reach me through WhatsApp . Building a Virtual Ethical Hacking Home Lab — Part 4: Attack Machine Setup was originally published in InfoSec Write-ups on Medium, where people are continuing the conversation by highlighting and responding to this story.
infosecwriteups.com
November 23, 2024 at 7:01 PM
Reposted by I Do Computer
Disallowed but Discoverable: The Hacker’s robots.txt Playbook
Ever felt like a pirate on the hunt for hidden treasure? 🏴‍☠️ As bug bounty hunters, we’re all about uncovering the secrets others try to… Continue reading on InfoSec Write-ups »
infosecwriteups.com
November 23, 2024 at 7:01 PM
Reposted by I Do Computer
Methods to bypass 403 & 401
Hello Hackers, today in this write-up I am going to give you all things you need to know to bypass 403 & 401 error page, some automation tools, tips and tricks, medium articles, hackerone disclosed reports all the thing so let’s get started. credit:copilot What is the difference between 403 & 401 Errors? • 401 Unauthorized: This error indicates the need for authentication. It often appears when a user isn’t logged in or lacks permission to access the resource. • 403 Forbidden: This code shows that while the server understands the request, it refuses to authorize it. Even an authenticated user might encounter this error due to permissions or IP restrictions. Now I hope you understand the difference between 403 & 401 error message :) Now let’s dive into some techniques you can use to bypass: Common Techniques for Bypassing 403/401 Pages 1) URL Manipulation: To test you can see following test case to bypass this type of restrictions. Now for understanding let’s say admin panel is restricted to access so we can use following test cases to bypass this restriction. · /admin -> 403 · /Admin -> 200 · /AdMin -> 200 · /admin/ -> 200 · /admin/. -> 200 · //admin// -> 200 · /.;/admin -> 200 · /./admin/.. -> 200 · /admin.json -> 200 · /;/admin -> 200 · //;//admin -> 200 · /admi%6e -> 200 [n is url encoded to %6e] · /%2e/admin -> 200 · /admin..;/ -> 200 You can also do fuzzing to this endpoints like this: · /FUZZ/admin · /admin/FUZZ · /adminFUZZ Sometimes /admin is not accessible but /admin/users may be accessible so to give some times to fuzzing is also fruitful. 2) Header Manipulation: In this method you can also use param Miner tool in burp suite to guess headers in the request. You can use following test cases: Like if our get request looks something like this: GET /admin HTTP/1.1 Host: target.com => 403 Forbidden Now if application supports headers like x-original-url, x-rewrite-url etc. then you can test manually in this way in burp. GET /anything HTTP/1.1 Host: target.com X-Original-URL: /admin OR GET /anything HTTP/1.1 Host: target.com X-Rewrite-URL: /admin There are more headers you can use something like this: · X-Originating-IP: 127.0.0.1 · X-Forwarded-For: 127.0.0.1 · X-Forwarded: 127.0.0.1 · Forwarded-For: 127.0.0.1 · X-Remote-IP: 127.0.0.1 · X-Remote-Addr: 127.0.0.1 · X-ProxyUser-Ip: 127.0.0.1 · X-Original-URL: 127.0.0.1 · Client-IP: 127.0.0.1 · True-Client-IP: 127.0.0.1 · Cluster-Client-IP: 127.0.0.1 · X-ProxyUser-Ip: 127.0.0.1 · Host: localhost 3) Parameter Tampering: In this type you can clearly see parameter which are given in false you can manually true it to access the page something like if the isAdmin=false parameter is set to false you can simply change it to true like isAdmin=true to access the resources. There is one more example like if the parameter value is set to be restricted like:  ?view=restricted you can simply change it to  ?view=public. You can also remove parameters which restrict you to access the page. So this is all about parameter tampering. 4) HTTP Method Switching: If you cannot access the resource using GET method then try to change the method like use HEAD, POST, PUT, TRACE, OPTIONS, DELETE, PATCH. Request looks something like this: GET /admin HTTP/1.1 Host: target.com Change method like this way: POST /admin HTTP/1.1 Host: target.com If the application supports method override header then you can also test like this way: POST /admin HTTP/1.1 Host: target.com X-http-method-override: GET Or X-http-override: GET Thus you can override the method and if WAF not configured properly then you can able to bypass. 5) Automation Tools: Now let’s come with most people interested topic automation! So there are already many tools for bypass this bad 403 & 401 but here I will give some tools which are more popular and industry recognized. · So the first tool is built in burpsuite you can simply download in burp by going to burp extensions -> BApp store -> 403 Bypasser see below image: GitHub - iamj0ker/bypass-403: A simple script just made for self use for bypassing 403 GitHub - Dheerajmadhukar/4-ZERO-3: 403/401 Bypass Methods + Bash Automation + Your Support ;) GitHub - diablo-101/403-bypass Note: My personal opinion please don’t rely on one tool use multiple tools to get better output. Because sometime one tool can’t give access but other one give you this happens so use multiple tools. 6) New Method: Actually I think this write-up explain you in better way he find out this method so go and read this article 👇 New technique 403 bypass lyncdiscover.microsoft.com 7) Medium Articles: · https://sapt.medium.com/bypassing-403-protection-to-get-pagespeed-admin-access-822fab64c0b3 · https://medium.com/@diablo0x/bypassing-403-forbidden-a-guide-for-cybersecurity-professionals-7b2225991595 · https://medium.com/@mohammed199709/improper-access-control-403-forbidden-bypass-489393ea112e · https://shrirangdiwakar.medium.com/bypassing-403s-like-a-pro-2-100-broken-access-control-66beef4afa8c · https://medium.com/@mares.viktor/unusual-403-bypass-to-a-full-website-takeover-external-pentest-4970c788c6bf 8) Hackerone disclosed Reports: · https://hackerone.com/reports/991717 · https://hackerone.com/reports/737323 · https://hackerone.com/reports/1011767 · https://hackerone.com/reports/1829170 So, that’s it for today, everyone. I look forward to seeing you in the next exciting article. Thank you for reading. I hope you learned something new from this piece. If you enjoyed it, please consider giving it a clap — it truly motivates me to create more awesome content. Another article which might helpful to you: Cracking ATO via Email HTML Injection Methods to bypass 403 & 401 was originally published in InfoSec Write-ups on Medium, where people are continuing the conversation by highlighting and responding to this story.
infosecwriteups.com
November 23, 2024 at 7:01 PM