


Dave/Hagan/Idiot
@binkythebomb.bsky.social
Professional idiot, part time madman, half human - half 'God knows what'. To confuse and annoy.
Person/Human Being
I occasionally 3D Print stuff https://www.myminifactory.com/users/binkythebomb
Person/Human Being
I occasionally 3D Print stuff https://www.myminifactory.com/users/binkythebomb
Finally replacing my old predator tank with a new-ish kit.
My old one was the half plastic/half metal kit that you could bludgeon a toddler with (almost did too).
Let's hope this one won't fall apart as often.
My old one was the half plastic/half metal kit that you could bludgeon a toddler with (almost did too).
Let's hope this one won't fall apart as often.

December 8, 2025 at 3:15 PM
Finally replacing my old predator tank with a new-ish kit.
My old one was the half plastic/half metal kit that you could bludgeon a toddler with (almost did too).
Let's hope this one won't fall apart as often.
My old one was the half plastic/half metal kit that you could bludgeon a toddler with (almost did too).
Let's hope this one won't fall apart as often.
That cancelled TV show you’ll never stop thinking about.

December 1, 2025 at 11:15 AM
That cancelled TV show you’ll never stop thinking about.
#3dprinting #wip #travellerrpg
HYPERION EXTERIOR IS DONE!
Okay, it's missing the resin parts being installed, but I'm leaving myself all week to finish that due to work.
Deck A parts are curing now, then later I get to dry fit everything and find if any parts need redoing.
HYPERION EXTERIOR IS DONE!
Okay, it's missing the resin parts being installed, but I'm leaving myself all week to finish that due to work.
Deck A parts are curing now, then later I get to dry fit everything and find if any parts need redoing.


August 10, 2025 at 8:30 AM
#3dprinting #wip #travellerrpg
HYPERION EXTERIOR IS DONE!
Okay, it's missing the resin parts being installed, but I'm leaving myself all week to finish that due to work.
Deck A parts are curing now, then later I get to dry fit everything and find if any parts need redoing.
HYPERION EXTERIOR IS DONE!
Okay, it's missing the resin parts being installed, but I'm leaving myself all week to finish that due to work.
Deck A parts are curing now, then later I get to dry fit everything and find if any parts need redoing.
And finally, the body of the Hyperion so far, minus all the resin parts.
Workspace is being redecorated, so I have no idea when the next update will be, and I'm working the next few days.
Workspace is being redecorated, so I have no idea when the next update will be, and I'm working the next few days.

August 9, 2025 at 9:28 PM
And finally, the body of the Hyperion so far, minus all the resin parts.
Workspace is being redecorated, so I have no idea when the next update will be, and I'm working the next few days.
Workspace is being redecorated, so I have no idea when the next update will be, and I'm working the next few days.
#3dprinting #travellerrpg #wip
The Hyperion is one step further along. Deck A grid is down, the walls installed and the outer dome printed.
Just the top to print, and then it's a lot of time with the boiling water and resin parts to install.
The Hyperion is one step further along. Deck A grid is down, the walls installed and the outer dome printed.
Just the top to print, and then it's a lot of time with the boiling water and resin parts to install.


August 9, 2025 at 9:28 PM
#3dprinting #travellerrpg #wip
The Hyperion is one step further along. Deck A grid is down, the walls installed and the outer dome printed.
Just the top to print, and then it's a lot of time with the boiling water and resin parts to install.
The Hyperion is one step further along. Deck A grid is down, the walls installed and the outer dome printed.
Just the top to print, and then it's a lot of time with the boiling water and resin parts to install.
#3dprinting #wip #travellerrpg
Now with more Gubbins!
2 laser power sources, one bulkhead & one airlock.
The dry fit is snug. And I do mean SNUG! I still need to print a few more special clips to hold it together.
Some sanding and cleaning will be needed to make it all fit perfectly.
Now with more Gubbins!
2 laser power sources, one bulkhead & one airlock.
The dry fit is snug. And I do mean SNUG! I still need to print a few more special clips to hold it together.
Some sanding and cleaning will be needed to make it all fit perfectly.


August 8, 2025 at 6:46 PM
#3dprinting #wip #travellerrpg
Now with more Gubbins!
2 laser power sources, one bulkhead & one airlock.
The dry fit is snug. And I do mean SNUG! I still need to print a few more special clips to hold it together.
Some sanding and cleaning will be needed to make it all fit perfectly.
Now with more Gubbins!
2 laser power sources, one bulkhead & one airlock.
The dry fit is snug. And I do mean SNUG! I still need to print a few more special clips to hold it together.
Some sanding and cleaning will be needed to make it all fit perfectly.
#3dprinting #travellerrpg #wip
Hyperion coming along nicely. Deck B grid now assembled, though waiting for some parts before it's ready.
RCS components are also now installed, and it all fits neatly together.
Internals are printed and need some cleanup before installing (not pictured).
Hyperion coming along nicely. Deck B grid now assembled, though waiting for some parts before it's ready.
RCS components are also now installed, and it all fits neatly together.
Internals are printed and need some cleanup before installing (not pictured).


August 7, 2025 at 9:42 PM
#3dprinting #travellerrpg #wip
Hyperion coming along nicely. Deck B grid now assembled, though waiting for some parts before it's ready.
RCS components are also now installed, and it all fits neatly together.
Internals are printed and need some cleanup before installing (not pictured).
Hyperion coming along nicely. Deck B grid now assembled, though waiting for some parts before it's ready.
RCS components are also now installed, and it all fits neatly together.
Internals are printed and need some cleanup before installing (not pictured).
More parts on the cutting mat.
Landing gear is a multi-part assembly for each corner.
Putting them together isn't a problem, but getting them slotted into place, however, is a pain.
A small pile of micro clips is needed to put it all together.
Bade plate and thrusters are now being printed.
Landing gear is a multi-part assembly for each corner.
Putting them together isn't a problem, but getting them slotted into place, however, is a pain.
A small pile of micro clips is needed to put it all together.
Bade plate and thrusters are now being printed.


August 5, 2025 at 4:01 PM
More parts on the cutting mat.
Landing gear is a multi-part assembly for each corner.
Putting them together isn't a problem, but getting them slotted into place, however, is a pain.
A small pile of micro clips is needed to put it all together.
Bade plate and thrusters are now being printed.
Landing gear is a multi-part assembly for each corner.
Putting them together isn't a problem, but getting them slotted into place, however, is a pain.
A small pile of micro clips is needed to put it all together.
Bade plate and thrusters are now being printed.
#3dprinting #wip #travellerrpg
Hyperion Deck C is largely finished. FDM bodywork and Resin parts (generators, fuel tank domes and ladder hatch).
Micro clips hold it all together.
Now for some minor cleanup before the landing legs are finished.
Hyperion Deck C is largely finished. FDM bodywork and Resin parts (generators, fuel tank domes and ladder hatch).
Micro clips hold it all together.
Now for some minor cleanup before the landing legs are finished.


August 5, 2025 at 11:51 AM
#3dprinting #wip #travellerrpg
Hyperion Deck C is largely finished. FDM bodywork and Resin parts (generators, fuel tank domes and ladder hatch).
Micro clips hold it all together.
Now for some minor cleanup before the landing legs are finished.
Hyperion Deck C is largely finished. FDM bodywork and Resin parts (generators, fuel tank domes and ladder hatch).
Micro clips hold it all together.
Now for some minor cleanup before the landing legs are finished.
Deck C, Assemble!
Okay, so Capt Cockup has yet to visit this build so far. The lower section is now loosely clipped together making sure it's all aligned properly.
Now printing the landing gear overnight, though it's still a 13-hour print.
I should probably start the resin parts too.
Okay, so Capt Cockup has yet to visit this build so far. The lower section is now loosely clipped together making sure it's all aligned properly.
Now printing the landing gear overnight, though it's still a 13-hour print.
I should probably start the resin parts too.

August 4, 2025 at 10:51 PM
Deck C, Assemble!
Okay, so Capt Cockup has yet to visit this build so far. The lower section is now loosely clipped together making sure it's all aligned properly.
Now printing the landing gear overnight, though it's still a 13-hour print.
I should probably start the resin parts too.
Okay, so Capt Cockup has yet to visit this build so far. The lower section is now loosely clipped together making sure it's all aligned properly.
Now printing the landing gear overnight, though it's still a 13-hour print.
I should probably start the resin parts too.
Clips, lots of clips, probably not enough clips.

August 4, 2025 at 10:28 PM
Clips, lots of clips, probably not enough clips.
#3dprinting #travellerrpg #wip
Hyperion Dropship Deck C is now ready for clips and all the fiddly detail work.
The clips will take about 3 hours to print enough to hold it together (32 or so, not counting the central square section) and a few more for comfort.
Resin parts to follow.
Hyperion Dropship Deck C is now ready for clips and all the fiddly detail work.
The clips will take about 3 hours to print enough to hold it together (32 or so, not counting the central square section) and a few more for comfort.
Resin parts to follow.


August 4, 2025 at 8:13 PM
#3dprinting #travellerrpg #wip
Hyperion Dropship Deck C is now ready for clips and all the fiddly detail work.
The clips will take about 3 hours to print enough to hold it together (32 or so, not counting the central square section) and a few more for comfort.
Resin parts to follow.
Hyperion Dropship Deck C is now ready for clips and all the fiddly detail work.
The clips will take about 3 hours to print enough to hold it together (32 or so, not counting the central square section) and a few more for comfort.
Resin parts to follow.
#3dprinting #wip
Spherical dropship started, engine room lower deck and hull sections. Printing at a slightly finer layer than usual due to all the fiddly bars.
Only a little sanding is required to take off the rough parts.
Sections 3 and 4 being printed now.
Spherical dropship started, engine room lower deck and hull sections. Printing at a slightly finer layer than usual due to all the fiddly bars.
Only a little sanding is required to take off the rough parts.
Sections 3 and 4 being printed now.


August 3, 2025 at 5:07 PM
#3dprinting #wip
Spherical dropship started, engine room lower deck and hull sections. Printing at a slightly finer layer than usual due to all the fiddly bars.
Only a little sanding is required to take off the rough parts.
Sections 3 and 4 being printed now.
Spherical dropship started, engine room lower deck and hull sections. Printing at a slightly finer layer than usual due to all the fiddly bars.
Only a little sanding is required to take off the rough parts.
Sections 3 and 4 being printed now.
Update: parts cured, arranged and partially assembled.
Type E Starfighter ready to knock on an enemy starship and ask if they've paid their insurance dues this month.
Missing are the missile pylons that need to be modified slightly.
Type E Starfighter ready to knock on an enemy starship and ask if they've paid their insurance dues this month.
Missing are the missile pylons that need to be modified slightly.

July 29, 2025 at 9:23 PM
Update: parts cured, arranged and partially assembled.
Type E Starfighter ready to knock on an enemy starship and ask if they've paid their insurance dues this month.
Missing are the missile pylons that need to be modified slightly.
Type E Starfighter ready to knock on an enemy starship and ask if they've paid their insurance dues this month.
Missing are the missile pylons that need to be modified slightly.
#wip #3dprinting
Type E prototype heavy fighter.
Black FDM bodywork, Yellow SLA addons and detail work.
The turret had to be in resin because of the detail (a previous one did not do well in filament).
Also realised that I did not print the rear fins. Oh well, at least I have spare filament.
Type E prototype heavy fighter.
Black FDM bodywork, Yellow SLA addons and detail work.
The turret had to be in resin because of the detail (a previous one did not do well in filament).
Also realised that I did not print the rear fins. Oh well, at least I have spare filament.


July 29, 2025 at 6:37 PM
#wip #3dprinting
Type E prototype heavy fighter.
Black FDM bodywork, Yellow SLA addons and detail work.
The turret had to be in resin because of the detail (a previous one did not do well in filament).
Also realised that I did not print the rear fins. Oh well, at least I have spare filament.
Type E prototype heavy fighter.
Black FDM bodywork, Yellow SLA addons and detail work.
The turret had to be in resin because of the detail (a previous one did not do well in filament).
Also realised that I did not print the rear fins. Oh well, at least I have spare filament.
Continued.
Air-raft model (hover-coupe). Fdm base, resin parts.
I've not experimented with clear resin yet so the front will have to wait for now.
Featured front, back and garage shots for scale.
Walls straightened after some minor warping (heat dipped in boiling water).
Air-raft model (hover-coupe). Fdm base, resin parts.
I've not experimented with clear resin yet so the front will have to wait for now.
Featured front, back and garage shots for scale.
Walls straightened after some minor warping (heat dipped in boiling water).


July 28, 2025 at 3:16 PM
Continued.
Air-raft model (hover-coupe). Fdm base, resin parts.
I've not experimented with clear resin yet so the front will have to wait for now.
Featured front, back and garage shots for scale.
Walls straightened after some minor warping (heat dipped in boiling water).
Air-raft model (hover-coupe). Fdm base, resin parts.
I've not experimented with clear resin yet so the front will have to wait for now.
Featured front, back and garage shots for scale.
Walls straightened after some minor warping (heat dipped in boiling water).
#3dprinting #travellerrpg #wip
It's dryfit day!
Scout S now has an engineroom deck that fits, is removable, and is now flanked by a garage module and passenger bay/airlock.
Also installed the hatches for the landing legs. I'm not 100% happy with how they turned out, but they fit.
It's dryfit day!
Scout S now has an engineroom deck that fits, is removable, and is now flanked by a garage module and passenger bay/airlock.
Also installed the hatches for the landing legs. I'm not 100% happy with how they turned out, but they fit.


July 28, 2025 at 1:57 PM
#3dprinting #travellerrpg #wip
It's dryfit day!
Scout S now has an engineroom deck that fits, is removable, and is now flanked by a garage module and passenger bay/airlock.
Also installed the hatches for the landing legs. I'm not 100% happy with how they turned out, but they fit.
It's dryfit day!
Scout S now has an engineroom deck that fits, is removable, and is now flanked by a garage module and passenger bay/airlock.
Also installed the hatches for the landing legs. I'm not 100% happy with how they turned out, but they fit.
I have way too much on my hobby table.
And a work meeting to attend.
On a Sunday.
And a work meeting to attend.
On a Sunday.

July 27, 2025 at 12:45 PM
I have way too much on my hobby table.
And a work meeting to attend.
On a Sunday.
And a work meeting to attend.
On a Sunday.
#3dprinting ##travellerrpg #wip
Scout S update.
I have a ship's cat.
And an engine room.
Still working through some of the resin issues (minor warping that requires some sanding and polishing).
Again, design by 2nd Dynasty
Scout S update.
I have a ship's cat.
And an engine room.
Still working through some of the resin issues (minor warping that requires some sanding and polishing).
Again, design by 2nd Dynasty


July 26, 2025 at 4:06 PM
#3dprinting ##travellerrpg #wip
Scout S update.
I have a ship's cat.
And an engine room.
Still working through some of the resin issues (minor warping that requires some sanding and polishing).
Again, design by 2nd Dynasty
Scout S update.
I have a ship's cat.
And an engine room.
Still working through some of the resin issues (minor warping that requires some sanding and polishing).
Again, design by 2nd Dynasty
Holiday Hobby Day 3.
##wip #3dprinting ##travellerrpg
Arrow Mk1 fighter, copper coloured filament and Yellow ABS resin detailed parts.
Printed the original parts a few years back, but the detail was poor and the thin parts broke.
The replacements seem sturdier, so next up is paint prep.
##wip #3dprinting ##travellerrpg
Arrow Mk1 fighter, copper coloured filament and Yellow ABS resin detailed parts.
Printed the original parts a few years back, but the detail was poor and the thin parts broke.
The replacements seem sturdier, so next up is paint prep.


July 17, 2025 at 10:54 AM
Holiday Hobby Day 3.
##wip #3dprinting ##travellerrpg
Arrow Mk1 fighter, copper coloured filament and Yellow ABS resin detailed parts.
Printed the original parts a few years back, but the detail was poor and the thin parts broke.
The replacements seem sturdier, so next up is paint prep.
##wip #3dprinting ##travellerrpg
Arrow Mk1 fighter, copper coloured filament and Yellow ABS resin detailed parts.
Printed the original parts a few years back, but the detail was poor and the thin parts broke.
The replacements seem sturdier, so next up is paint prep.
Day 2 of the holiday.
#wip #travellerrpg #3dprinting
Internal components started. SLA printer (resin) components in grey and yellow.
The grey corridor section came in 4 parts clipped together. Control console and cockpit hatchway added.
Yellow components for the Shuttle Alpha (not pictured).
#wip #travellerrpg #3dprinting
Internal components started. SLA printer (resin) components in grey and yellow.
The grey corridor section came in 4 parts clipped together. Control console and cockpit hatchway added.
Yellow components for the Shuttle Alpha (not pictured).


July 16, 2025 at 11:03 AM
Day 2 of the holiday.
#wip #travellerrpg #3dprinting
Internal components started. SLA printer (resin) components in grey and yellow.
The grey corridor section came in 4 parts clipped together. Control console and cockpit hatchway added.
Yellow components for the Shuttle Alpha (not pictured).
#wip #travellerrpg #3dprinting
Internal components started. SLA printer (resin) components in grey and yellow.
The grey corridor section came in 4 parts clipped together. Control console and cockpit hatchway added.
Yellow components for the Shuttle Alpha (not pictured).
#wip #3dprinting ##travellerrpg More progress made.
We now have legs (alternate versions from the multipart originals). Solid parts (no infill for strength) so it can take the weight.
It's still a little flimsy to hold, it needs the internal parts for strength. Upper deck and jump engine to start.
We now have legs (alternate versions from the multipart originals). Solid parts (no infill for strength) so it can take the weight.
It's still a little flimsy to hold, it needs the internal parts for strength. Upper deck and jump engine to start.


July 13, 2025 at 2:42 PM
#wip #3dprinting ##travellerrpg More progress made.
We now have legs (alternate versions from the multipart originals). Solid parts (no infill for strength) so it can take the weight.
It's still a little flimsy to hold, it needs the internal parts for strength. Upper deck and jump engine to start.
We now have legs (alternate versions from the multipart originals). Solid parts (no infill for strength) so it can take the weight.
It's still a little flimsy to hold, it needs the internal parts for strength. Upper deck and jump engine to start.
#3dprinting #wip #travellerrpg
Scout S is coming along. Still missing some hull segments, but otherwise the exterior is done.
Now for all the Interior sections.
Scout S is coming along. Still missing some hull segments, but otherwise the exterior is done.
Now for all the Interior sections.


July 11, 2025 at 5:50 PM
#3dprinting #wip #travellerrpg
Scout S is coming along. Still missing some hull segments, but otherwise the exterior is done.
Now for all the Interior sections.
Scout S is coming along. Still missing some hull segments, but otherwise the exterior is done.
Now for all the Interior sections.
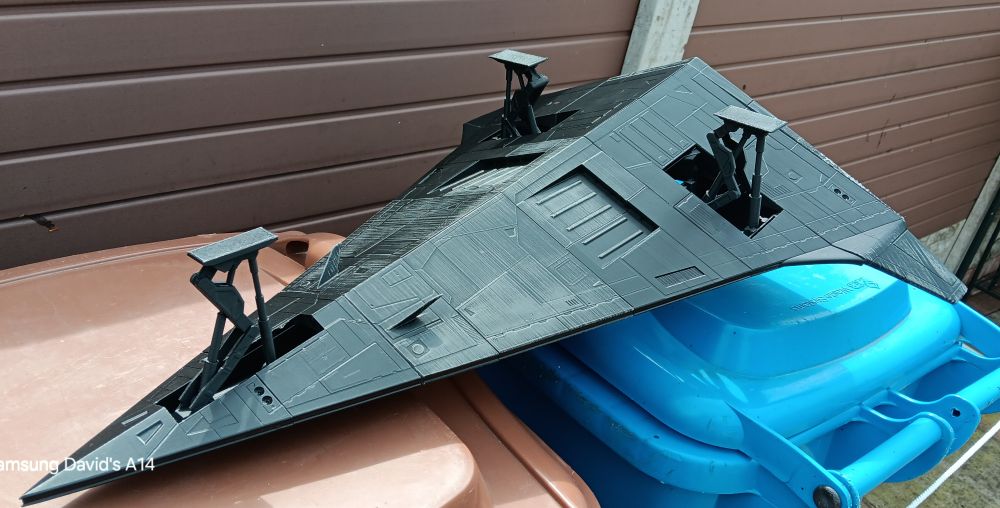
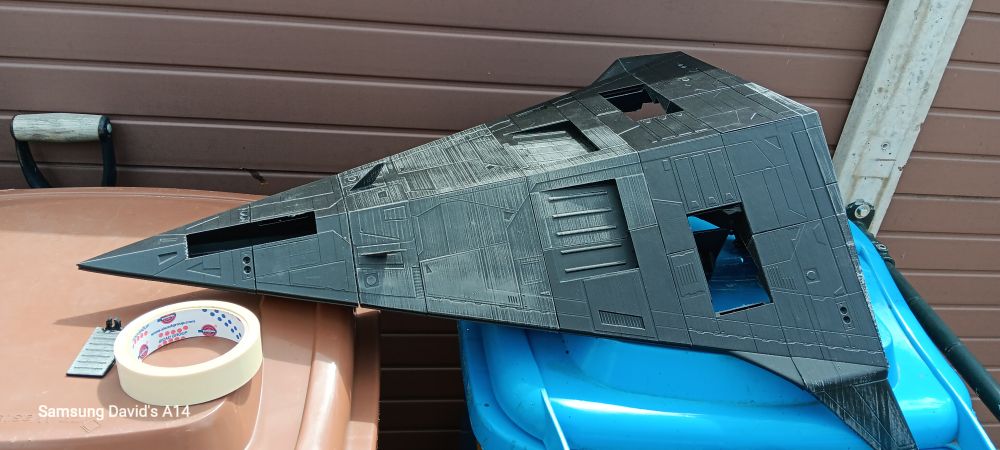
Current #3dprinting #wip assembled (so far) top and bottom (ladies!).
Went for the winged atmosphere variant.
The lower hull is complete, just waiting for a few pieces to finish up the back section so it holds together better (it feels like I'm holding jelly as I carry it).
Bin lid for scale.
Went for the winged atmosphere variant.
The lower hull is complete, just waiting for a few pieces to finish up the back section so it holds together better (it feels like I'm holding jelly as I carry it).
Bin lid for scale.

July 7, 2025 at 2:55 PM
Current #3dprinting #wip assembled (so far) top and bottom (ladies!).
Went for the winged atmosphere variant.
The lower hull is complete, just waiting for a few pieces to finish up the back section so it holds together better (it feels like I'm holding jelly as I carry it).
Bin lid for scale.
Went for the winged atmosphere variant.
The lower hull is complete, just waiting for a few pieces to finish up the back section so it holds together better (it feels like I'm holding jelly as I carry it).
Bin lid for scale.
My current #3dprinting #wip a Scout S from the Traveller RPG.
Still a way to go, but thankfully I can leave the printer unattended while at work (only 2 cock ups, but my fault).
Small roll of tape for scale.
Still a way to go, but thankfully I can leave the printer unattended while at work (only 2 cock ups, but my fault).
Small roll of tape for scale.

July 7, 2025 at 2:28 PM
My current #3dprinting #wip a Scout S from the Traveller RPG.
Still a way to go, but thankfully I can leave the printer unattended while at work (only 2 cock ups, but my fault).
Small roll of tape for scale.
Still a way to go, but thankfully I can leave the printer unattended while at work (only 2 cock ups, but my fault).
Small roll of tape for scale.