


Bark it Up! Suits and Rave Gear
@barkitup.dog
Custom Rave gear, Fursuits and adoptable Art refs
-
Owners
@zbit.barkitup.dog -Electronics and Management.
@mori.barkitup.dog -Fursuits and Art
Banner art @beeptreat.bsky.social
-
Owners
@zbit.barkitup.dog -Electronics and Management.
@mori.barkitup.dog -Fursuits and Art
Banner art @beeptreat.bsky.social
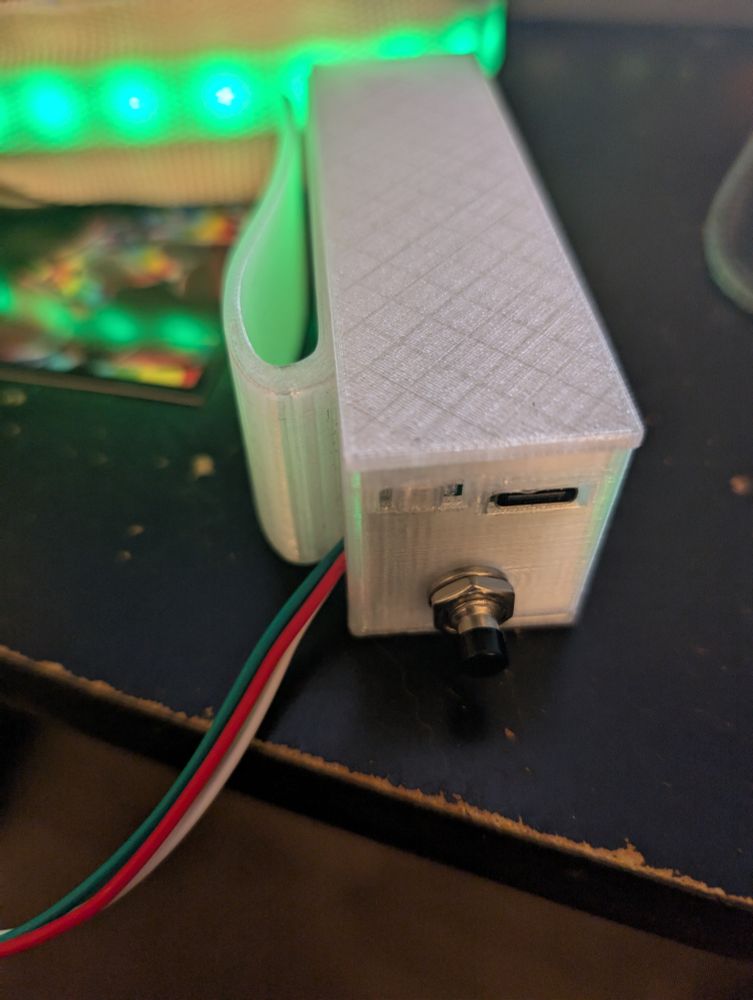
Modular 3-pin JST connector used.
Connects to harness/collar at specific input points.
Switching on, the LEDs will flash green and start in static FFT mode.
Press the button to switch modes.
Hold the button until the LEDs flash Red to lock.
Hold the button until the LEDs flash green to unlock.
Connects to harness/collar at specific input points.
Switching on, the LEDs will flash green and start in static FFT mode.
Press the button to switch modes.
Hold the button until the LEDs flash Red to lock.
Hold the button until the LEDs flash green to unlock.


November 18, 2025 at 4:07 PM
Modular 3-pin JST connector used.
Connects to harness/collar at specific input points.
Switching on, the LEDs will flash green and start in static FFT mode.
Press the button to switch modes.
Hold the button until the LEDs flash Red to lock.
Hold the button until the LEDs flash green to unlock.
Connects to harness/collar at specific input points.
Switching on, the LEDs will flash green and start in static FFT mode.
Press the button to switch modes.
Hold the button until the LEDs flash Red to lock.
Hold the button until the LEDs flash green to unlock.
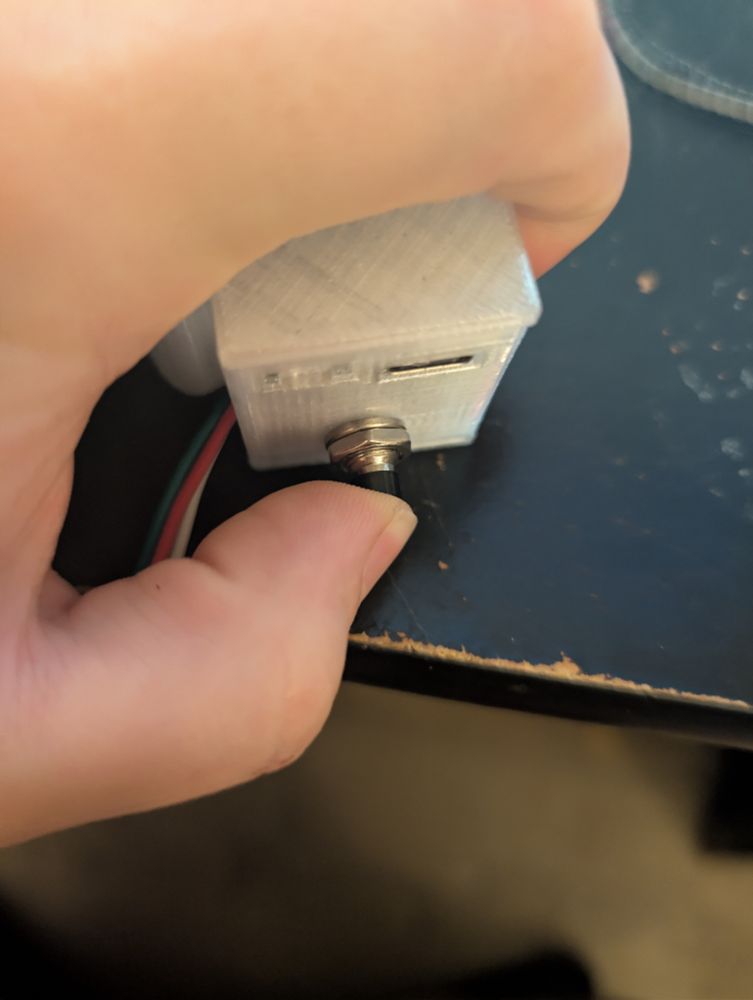
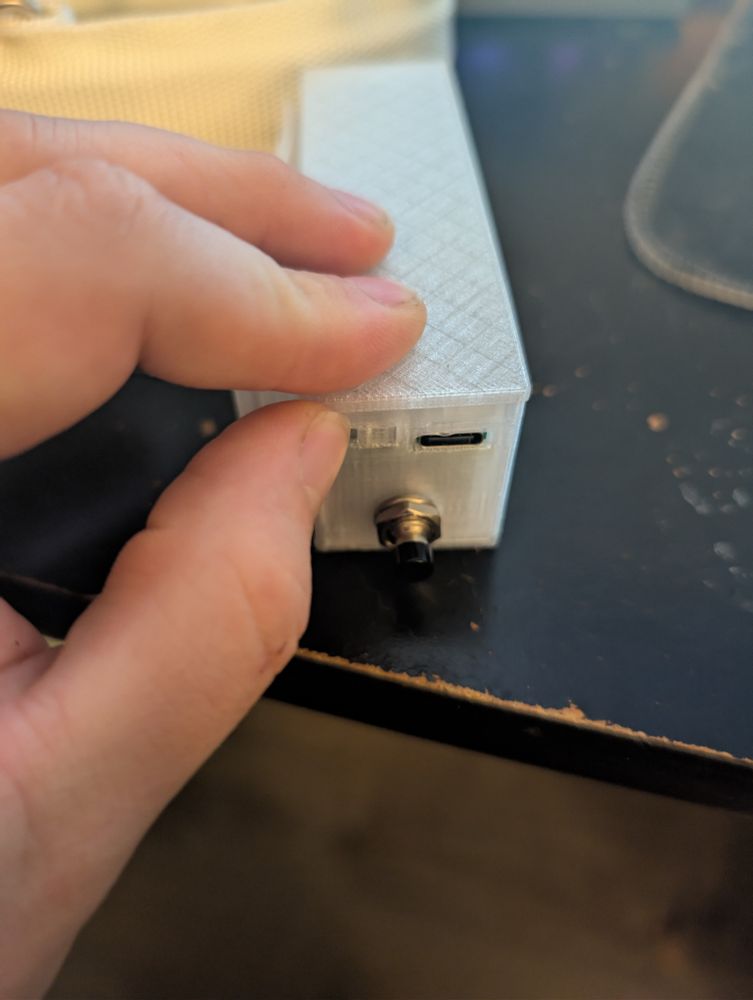
Box!
Designed for easy use, even while wearing paws or mitts.
3d printed PETG enclosure.
Integrated clip.
Slide toggle switch for on/off.
Low profile to prevent accidental toggle.
Single push button to change or lock the mode.
Single swappable 18650 battery.
USB-C for run and/or charge.
Designed for easy use, even while wearing paws or mitts.
3d printed PETG enclosure.
Integrated clip.
Slide toggle switch for on/off.
Low profile to prevent accidental toggle.
Single push button to change or lock the mode.
Single swappable 18650 battery.
USB-C for run and/or charge.


November 18, 2025 at 4:07 PM
Box!
Designed for easy use, even while wearing paws or mitts.
3d printed PETG enclosure.
Integrated clip.
Slide toggle switch for on/off.
Low profile to prevent accidental toggle.
Single push button to change or lock the mode.
Single swappable 18650 battery.
USB-C for run and/or charge.
Designed for easy use, even while wearing paws or mitts.
3d printed PETG enclosure.
Integrated clip.
Slide toggle switch for on/off.
Low profile to prevent accidental toggle.
Single push button to change or lock the mode.
Single swappable 18650 battery.
USB-C for run and/or charge.
Work shopping some hook and loop for slight adjustability at some key connection points.
New X design
Allows the leg strap add-ons on the current MFF 7-point build to be modular
Will update with some better photos once the harness is on the fursuit it was measured for
Set for LAUNCH!
<3
-Z
New X design
Allows the leg strap add-ons on the current MFF 7-point build to be modular
Will update with some better photos once the harness is on the fursuit it was measured for
Set for LAUNCH!
<3
-Z


November 18, 2025 at 3:35 PM
Work shopping some hook and loop for slight adjustability at some key connection points.
New X design
Allows the leg strap add-ons on the current MFF 7-point build to be modular
Will update with some better photos once the harness is on the fursuit it was measured for
Set for LAUNCH!
<3
-Z
New X design
Allows the leg strap add-ons on the current MFF 7-point build to be modular
Will update with some better photos once the harness is on the fursuit it was measured for
Set for LAUNCH!
<3
-Z
Got a battery for the multimeter.
Power testing puts my 600+ LED and 6+ hour runtime estimates in the ballpark of EXTREMELY conservative.
TL;DR: there's enough juice to rave all night.
Also run+charge via power bank or swap 18650 batteries.
Either way, the power ceiling is HIGH.
<3
-Z
Power testing puts my 600+ LED and 6+ hour runtime estimates in the ballpark of EXTREMELY conservative.
TL;DR: there's enough juice to rave all night.
Also run+charge via power bank or swap 18650 batteries.
Either way, the power ceiling is HIGH.
<3
-Z
November 11, 2025 at 1:33 AM
Got a battery for the multimeter.
Power testing puts my 600+ LED and 6+ hour runtime estimates in the ballpark of EXTREMELY conservative.
TL;DR: there's enough juice to rave all night.
Also run+charge via power bank or swap 18650 batteries.
Either way, the power ceiling is HIGH.
<3
-Z
Power testing puts my 600+ LED and 6+ hour runtime estimates in the ballpark of EXTREMELY conservative.
TL;DR: there's enough juice to rave all night.
Also run+charge via power bank or swap 18650 batteries.
Either way, the power ceiling is HIGH.
<3
-Z
FFT video of the X as a treat!
Gotta sew these up and run full battery life tests!
<3
-Z
Gotta sew these up and run full battery life tests!
<3
-Z
November 9, 2025 at 9:37 PM
FFT video of the X as a treat!
Gotta sew these up and run full battery life tests!
<3
-Z
Gotta sew these up and run full battery life tests!
<3
-Z
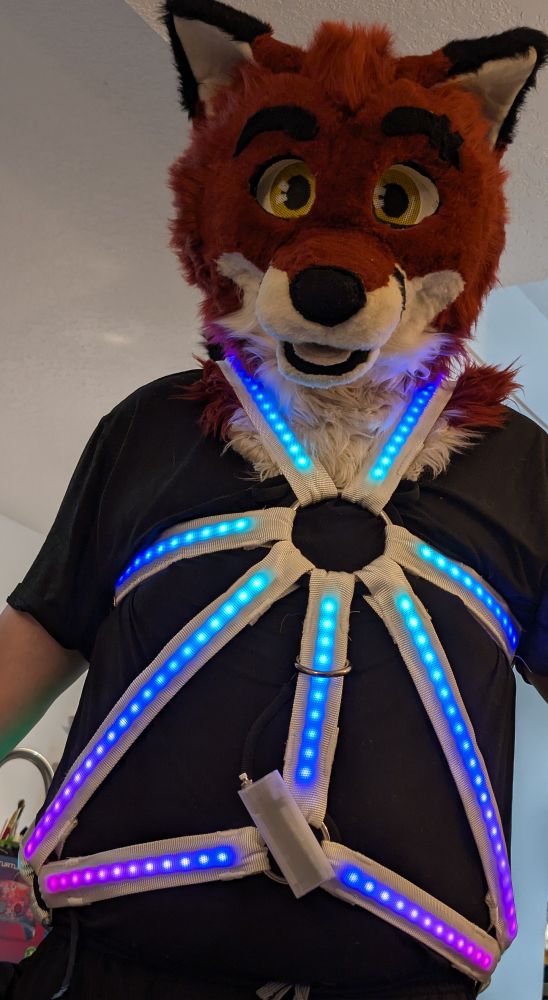
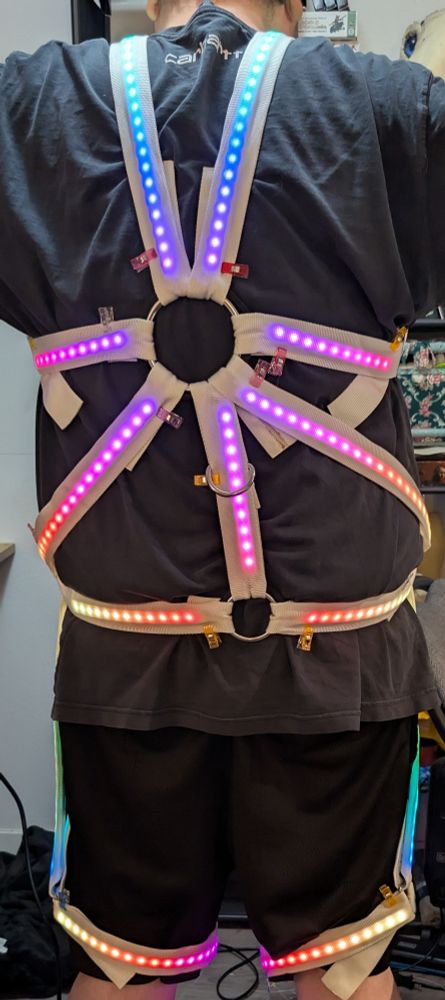
MFF prepping!
New 'Full' 7-Point Style! (with Leg Strap Add-on)
252 LEDs! (+106 LEDs = 358 LEDs)
Designed for a friend in fursuit so excuse the slack! :3
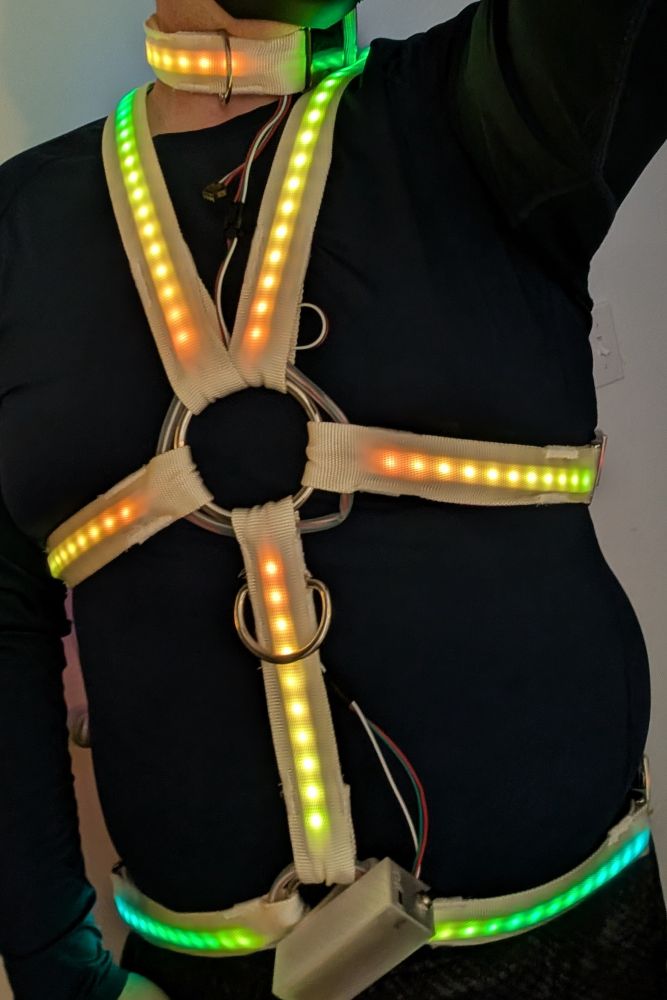
Redesigned 'X' 4-Point Style!
138 LEDs!
Let's gooo!
New 'Full' 7-Point Style! (with Leg Strap Add-on)
252 LEDs! (+106 LEDs = 358 LEDs)
Designed for a friend in fursuit so excuse the slack! :3
Redesigned 'X' 4-Point Style!
138 LEDs!
Let's gooo!


November 9, 2025 at 9:33 PM
MFF prepping!
New 'Full' 7-Point Style! (with Leg Strap Add-on)
252 LEDs! (+106 LEDs = 358 LEDs)
Designed for a friend in fursuit so excuse the slack! :3
Redesigned 'X' 4-Point Style!
138 LEDs!
Let's gooo!
New 'Full' 7-Point Style! (with Leg Strap Add-on)
252 LEDs! (+106 LEDs = 358 LEDs)
Designed for a friend in fursuit so excuse the slack! :3
Redesigned 'X' 4-Point Style!
138 LEDs!
Let's gooo!
Side note:
Pre-orders will open MFF weekend for payment and processing to begin in January.
(Tax stuff)
Still need to process a few personal/gift builds for photos on the form and measuring guidelines/diagrams.
Want to make your own? Check the pin post. I've made everything open source.
<3
-Z
Pre-orders will open MFF weekend for payment and processing to begin in January.
(Tax stuff)
Still need to process a few personal/gift builds for photos on the form and measuring guidelines/diagrams.
Want to make your own? Check the pin post. I've made everything open source.
<3
-Z

October 27, 2025 at 8:59 PM
Side note:
Pre-orders will open MFF weekend for payment and processing to begin in January.
(Tax stuff)
Still need to process a few personal/gift builds for photos on the form and measuring guidelines/diagrams.
Want to make your own? Check the pin post. I've made everything open source.
<3
-Z
Pre-orders will open MFF weekend for payment and processing to begin in January.
(Tax stuff)
Still need to process a few personal/gift builds for photos on the form and measuring guidelines/diagrams.
Want to make your own? Check the pin post. I've made everything open source.
<3
-Z
Modes!
FFT Random - LED location chosen randomly when frequency is triggered.
FFT static - Frequency spectrum analyzer
Fade - Fades through the 8 colors in the spectrum.
Rainbow - rainbow scrolls across the length.
Streak - streaks of colors go up and down before switching to the next colors
FFT Random - LED location chosen randomly when frequency is triggered.
FFT static - Frequency spectrum analyzer
Fade - Fades through the 8 colors in the spectrum.
Rainbow - rainbow scrolls across the length.
Streak - streaks of colors go up and down before switching to the next colors
October 27, 2025 at 8:29 PM
Modes!
FFT Random - LED location chosen randomly when frequency is triggered.
FFT static - Frequency spectrum analyzer
Fade - Fades through the 8 colors in the spectrum.
Rainbow - rainbow scrolls across the length.
Streak - streaks of colors go up and down before switching to the next colors
FFT Random - LED location chosen randomly when frequency is triggered.
FFT static - Frequency spectrum analyzer
Fade - Fades through the 8 colors in the spectrum.
Rainbow - rainbow scrolls across the length.
Streak - streaks of colors go up and down before switching to the next colors
Field testing!
Gear night at a local venue.
A lot of fun! Pups, fuzzies, and everything in between!
We got in a bit early to get some action shots before it got bumping.
Gear night at a local venue.
A lot of fun! Pups, fuzzies, and everything in between!
We got in a bit early to get some action shots before it got bumping.
October 27, 2025 at 8:29 PM
Field testing!
Gear night at a local venue.
A lot of fun! Pups, fuzzies, and everything in between!
We got in a bit early to get some action shots before it got bumping.
Gear night at a local venue.
A lot of fun! Pups, fuzzies, and everything in between!
We got in a bit early to get some action shots before it got bumping.
Slightly thrown together in 2 evenings so it can be tested tonight and at other events!
Reconsidering the heat shrink on the links or perhaps more exact measure of wiring and shrink.
Will see how it holds up in testing!
<3
-Z
Reconsidering the heat shrink on the links or perhaps more exact measure of wiring and shrink.
Will see how it holds up in testing!
<3
-Z
October 17, 2025 at 3:13 PM
Slightly thrown together in 2 evenings so it can be tested tonight and at other events!
Reconsidering the heat shrink on the links or perhaps more exact measure of wiring and shrink.
Will see how it holds up in testing!
<3
-Z
Reconsidering the heat shrink on the links or perhaps more exact measure of wiring and shrink.
Will see how it holds up in testing!
<3
-Z
Oh yeah!
We got a business card!
Testing the hardware at a few local venues in the coming weeks.
Pre-order soft launch to follow!
<3
-Z
We got a business card!
Testing the hardware at a few local venues in the coming weeks.
Pre-order soft launch to follow!
<3
-Z

October 16, 2025 at 2:26 PM
Oh yeah!
We got a business card!
Testing the hardware at a few local venues in the coming weeks.
Pre-order soft launch to follow!
<3
-Z
We got a business card!
Testing the hardware at a few local venues in the coming weeks.
Pre-order soft launch to follow!
<3
-Z
Next up is full assembly!
Strips are inserted into pre-cut, pre-sized 1.5" tubular nylon webbing.
( Had to custom order :P )
Arranged and pinned around the metal hardware.
( Re-measured for accuracy to provided specifications )
And finally stitched with a clean 'satin' style stitching.
Strips are inserted into pre-cut, pre-sized 1.5" tubular nylon webbing.
( Had to custom order :P )
Arranged and pinned around the metal hardware.
( Re-measured for accuracy to provided specifications )
And finally stitched with a clean 'satin' style stitching.


October 10, 2025 at 3:23 PM
Next up is full assembly!
Strips are inserted into pre-cut, pre-sized 1.5" tubular nylon webbing.
( Had to custom order :P )
Arranged and pinned around the metal hardware.
( Re-measured for accuracy to provided specifications )
And finally stitched with a clean 'satin' style stitching.
Strips are inserted into pre-cut, pre-sized 1.5" tubular nylon webbing.
( Had to custom order :P )
Arranged and pinned around the metal hardware.
( Re-measured for accuracy to provided specifications )
And finally stitched with a clean 'satin' style stitching.
LED strips then get inserted into a diffuser silicone strip for extra protection, reinforcement, and to add some resistance to moisture.
These are sealed at both ends with hot glue and/or silicone.
Once that's all wired, sealed, and dried, I run a full electrical test in all controller modes.
These are sealed at both ends with hot glue and/or silicone.
Once that's all wired, sealed, and dried, I run a full electrical test in all controller modes.


October 10, 2025 at 3:10 PM
LED strips then get inserted into a diffuser silicone strip for extra protection, reinforcement, and to add some resistance to moisture.
These are sealed at both ends with hot glue and/or silicone.
Once that's all wired, sealed, and dried, I run a full electrical test in all controller modes.
These are sealed at both ends with hot glue and/or silicone.
Once that's all wired, sealed, and dried, I run a full electrical test in all controller modes.
While we're here, a build overview!
Each LED strip is cut to size and joints soldered for reinforcement.
Wire layout is soldered on with input connectors for daisy chaining a collar and/or a leash or just connecting the controller at a different spot.
3 here for 'Standard' style.
Each LED strip is cut to size and joints soldered for reinforcement.
Wire layout is soldered on with input connectors for daisy chaining a collar and/or a leash or just connecting the controller at a different spot.
3 here for 'Standard' style.


October 10, 2025 at 3:10 PM
While we're here, a build overview!
Each LED strip is cut to size and joints soldered for reinforcement.
Wire layout is soldered on with input connectors for daisy chaining a collar and/or a leash or just connecting the controller at a different spot.
3 here for 'Standard' style.
Each LED strip is cut to size and joints soldered for reinforcement.
Wire layout is soldered on with input connectors for daisy chaining a collar and/or a leash or just connecting the controller at a different spot.
3 here for 'Standard' style.
All the pieces are in place, time to start building!
This one will have plastic buckles and stainless steel hardware due to a nickel sensitivity of the wearer.
Testing layouts and some application of heat shrink for a little extra protection!
This one will have plastic buckles and stainless steel hardware due to a nickel sensitivity of the wearer.
Testing layouts and some application of heat shrink for a little extra protection!

October 10, 2025 at 2:51 PM
All the pieces are in place, time to start building!
This one will have plastic buckles and stainless steel hardware due to a nickel sensitivity of the wearer.
Testing layouts and some application of heat shrink for a little extra protection!
This one will have plastic buckles and stainless steel hardware due to a nickel sensitivity of the wearer.
Testing layouts and some application of heat shrink for a little extra protection!
Hm yes lovely.
Was doing the finishing touches before the nose and mouth inserts and pulled too hard on the backing on the left side. Now I have to replace the red parts that are taped for the pattern.
Other than that hiccup, the head is almost done.
The fursuit makers chacha never ends.
-Mori
Was doing the finishing touches before the nose and mouth inserts and pulled too hard on the backing on the left side. Now I have to replace the red parts that are taped for the pattern.
Other than that hiccup, the head is almost done.
The fursuit makers chacha never ends.
-Mori


October 8, 2025 at 12:57 AM
Hm yes lovely.
Was doing the finishing touches before the nose and mouth inserts and pulled too hard on the backing on the left side. Now I have to replace the red parts that are taped for the pattern.
Other than that hiccup, the head is almost done.
The fursuit makers chacha never ends.
-Mori
Was doing the finishing touches before the nose and mouth inserts and pulled too hard on the backing on the left side. Now I have to replace the red parts that are taped for the pattern.
Other than that hiccup, the head is almost done.
The fursuit makers chacha never ends.
-Mori
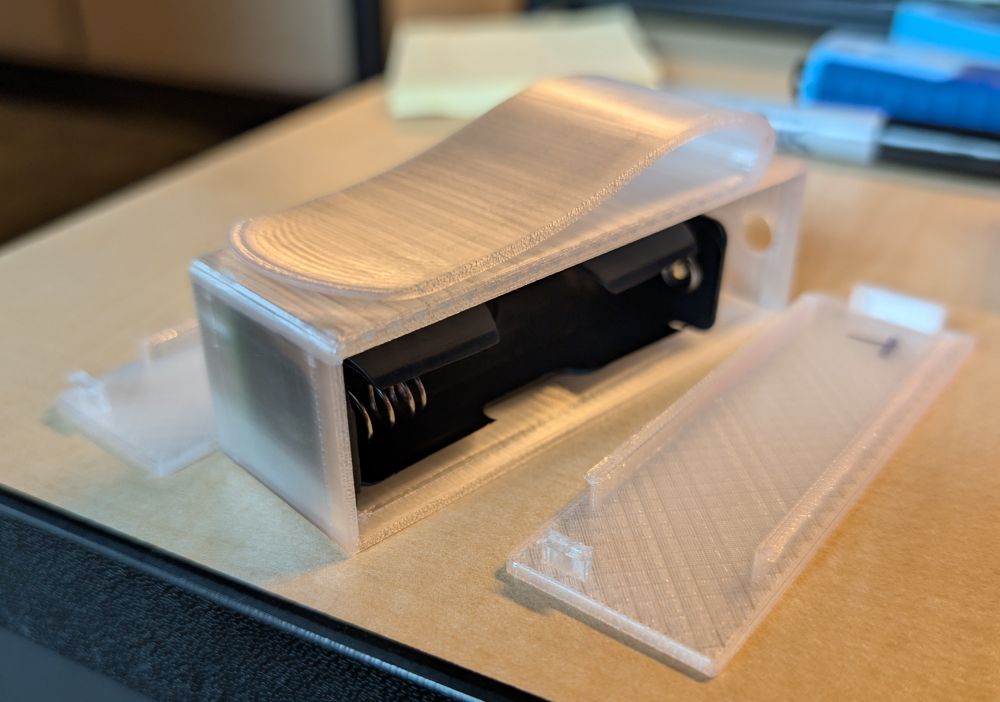
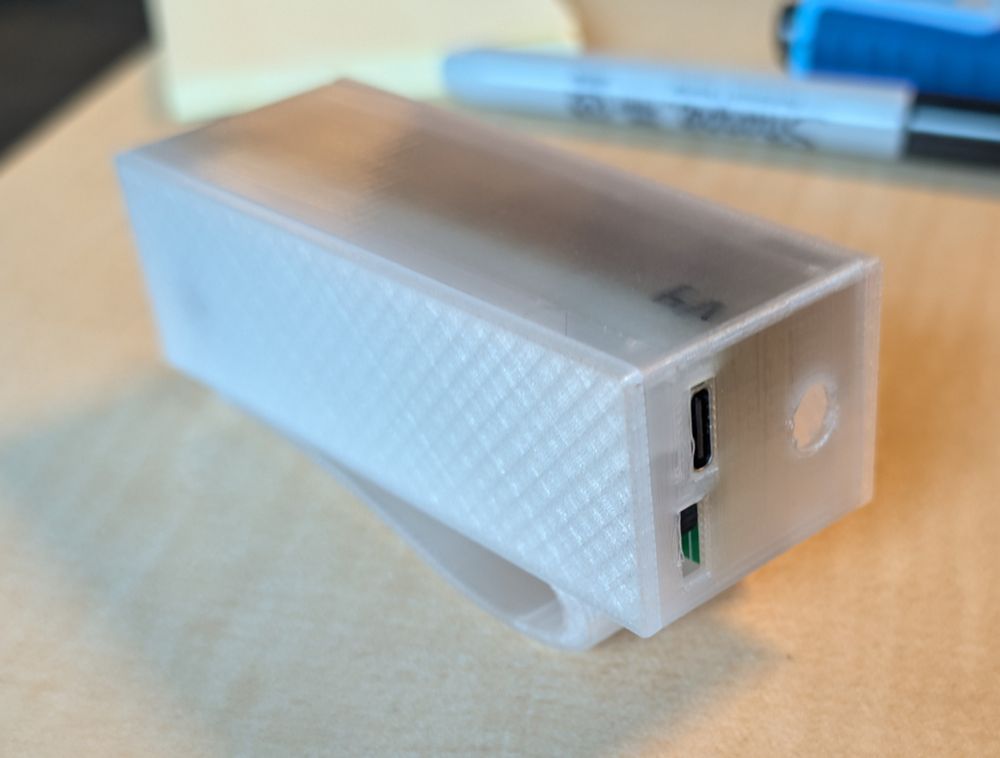
Box! v2!
Clear(ish) PETG, slightly thicker walls, snap lid on top and bottom.
Clip!
Adding a little switch cover/extension for the power switch, but this is the final revision for now!
(Special thanks to co-worker with new Bambu printer for multiple revisions and test prints)
Clear(ish) PETG, slightly thicker walls, snap lid on top and bottom.
Clip!
Adding a little switch cover/extension for the power switch, but this is the final revision for now!
(Special thanks to co-worker with new Bambu printer for multiple revisions and test prints)


October 1, 2025 at 9:42 PM
Box! v2!
Clear(ish) PETG, slightly thicker walls, snap lid on top and bottom.
Clip!
Adding a little switch cover/extension for the power switch, but this is the final revision for now!
(Special thanks to co-worker with new Bambu printer for multiple revisions and test prints)
Clear(ish) PETG, slightly thicker walls, snap lid on top and bottom.
Clip!
Adding a little switch cover/extension for the power switch, but this is the final revision for now!
(Special thanks to co-worker with new Bambu printer for multiple revisions and test prints)
Boards!
Finishing touches on enclosure box to be revealed soon!
Finishing touches on enclosure box to be revealed soon!


October 1, 2025 at 2:34 AM
Boards!
Finishing touches on enclosure box to be revealed soon!
Finishing touches on enclosure box to be revealed soon!
Don't mind the mess. (And all the posts on sites that is all Barkitup related)
95% done (pinned), Need finishing touches - nose and teeth.
I hope it gets done This October or I'm going to cry lol. I feel bad that I've been going so slow, but sickness took over and I needed a long rest.
-Mori
95% done (pinned), Need finishing touches - nose and teeth.
I hope it gets done This October or I'm going to cry lol. I feel bad that I've been going so slow, but sickness took over and I needed a long rest.
-Mori


September 30, 2025 at 8:56 AM
Don't mind the mess. (And all the posts on sites that is all Barkitup related)
95% done (pinned), Need finishing touches - nose and teeth.
I hope it gets done This October or I'm going to cry lol. I feel bad that I've been going so slow, but sickness took over and I needed a long rest.
-Mori
95% done (pinned), Need finishing touches - nose and teeth.
I hope it gets done This October or I'm going to cry lol. I feel bad that I've been going so slow, but sickness took over and I needed a long rest.
-Mori
300 LED on Custom Controller test!
Multimeter apparently not reading voltage or current properly after sitting in storage so long.
Half of the calculated limit on the controller.
Ran FFT mode for over 3 hours before test was interrupted. (Cats ...)
Multimeter apparently not reading voltage or current properly after sitting in storage so long.
Half of the calculated limit on the controller.
Ran FFT mode for over 3 hours before test was interrupted. (Cats ...)


September 29, 2025 at 7:28 AM
300 LED on Custom Controller test!
Multimeter apparently not reading voltage or current properly after sitting in storage so long.
Half of the calculated limit on the controller.
Ran FFT mode for over 3 hours before test was interrupted. (Cats ...)
Multimeter apparently not reading voltage or current properly after sitting in storage so long.
Half of the calculated limit on the controller.
Ran FFT mode for over 3 hours before test was interrupted. (Cats ...)
SAMD21 microcontroller!
Audio collection and processing onboard!
Pinouts for the button and LED strip connector!
Currently spec'd using the 21E17A variant due to chip availability.
Custom bootloader, UF2 uploads, partial Arduino IDE support. (Export sketch, convert into UF2)
Did I mention clip?
Audio collection and processing onboard!
Pinouts for the button and LED strip connector!
Currently spec'd using the 21E17A variant due to chip availability.
Custom bootloader, UF2 uploads, partial Arduino IDE support. (Export sketch, convert into UF2)
Did I mention clip?


September 18, 2025 at 4:34 AM
SAMD21 microcontroller!
Audio collection and processing onboard!
Pinouts for the button and LED strip connector!
Currently spec'd using the 21E17A variant due to chip availability.
Custom bootloader, UF2 uploads, partial Arduino IDE support. (Export sketch, convert into UF2)
Did I mention clip?
Audio collection and processing onboard!
Pinouts for the button and LED strip connector!
Currently spec'd using the 21E17A variant due to chip availability.
Custom bootloader, UF2 uploads, partial Arduino IDE support. (Export sketch, convert into UF2)
Did I mention clip?
That's 600+ LEDs at 1/8 brightness.
(60mA per LED at full bright + full white = 7.5mA at 1/8 brightness)
5000 mA / 7.5 = holy cow that's a lot of LEDs.
Haven't had a build use that many yet, but nice to know the option is there.
18650 rated for higher amperage as used in vapes.
(60mA per LED at full bright + full white = 7.5mA at 1/8 brightness)
5000 mA / 7.5 = holy cow that's a lot of LEDs.
Haven't had a build use that many yet, but nice to know the option is there.
18650 rated for higher amperage as used in vapes.


September 18, 2025 at 4:34 AM
That's 600+ LEDs at 1/8 brightness.
(60mA per LED at full bright + full white = 7.5mA at 1/8 brightness)
5000 mA / 7.5 = holy cow that's a lot of LEDs.
Haven't had a build use that many yet, but nice to know the option is there.
18650 rated for higher amperage as used in vapes.
(60mA per LED at full bright + full white = 7.5mA at 1/8 brightness)
5000 mA / 7.5 = holy cow that's a lot of LEDs.
Haven't had a build use that many yet, but nice to know the option is there.
18650 rated for higher amperage as used in vapes.
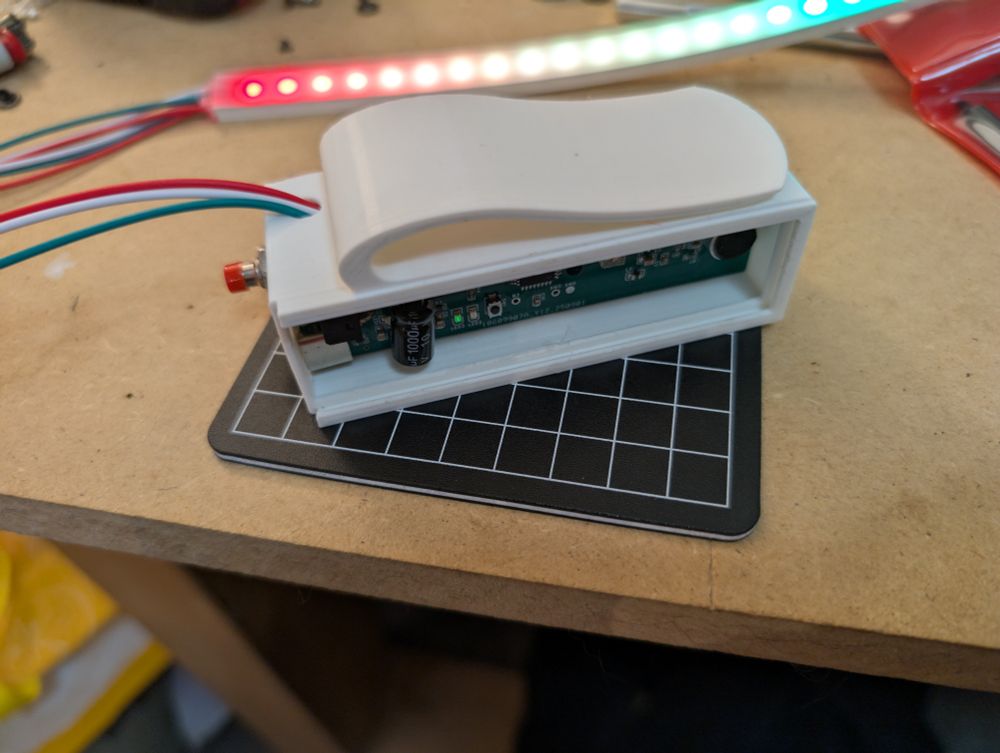
Box! Button! USB!
Custom PCB based on a few Adafruit dev boards with some components beefed up for higher amperage, more LED potential, and use of 18650 battery.
Can be run and/or charged via onboard USB-C.
1 amp limited charge rate.
Main switching diodes rated for 5A.
Custom PCB based on a few Adafruit dev boards with some components beefed up for higher amperage, more LED potential, and use of 18650 battery.
Can be run and/or charged via onboard USB-C.
1 amp limited charge rate.
Main switching diodes rated for 5A.


September 18, 2025 at 4:34 AM
Box! Button! USB!
Custom PCB based on a few Adafruit dev boards with some components beefed up for higher amperage, more LED potential, and use of 18650 battery.
Can be run and/or charged via onboard USB-C.
1 amp limited charge rate.
Main switching diodes rated for 5A.
Custom PCB based on a few Adafruit dev boards with some components beefed up for higher amperage, more LED potential, and use of 18650 battery.
Can be run and/or charged via onboard USB-C.
1 amp limited charge rate.
Main switching diodes rated for 5A.
So... Metal hardware rivets or sewn edge?


September 16, 2025 at 6:45 PM
So... Metal hardware rivets or sewn edge?
Mode test :D
September 1, 2025 at 8:15 AM
Mode test :D