


It's far from perfect and one day I might make a third iteration of Nines but I'm kinda proud of it for now. I'm definitely going to re-glue the wig with the correct glue when I get the chance as well as fixing the styling as well as improving the armband and making a skirt for a summer-friendly ver

October 25, 2025 at 9:24 PM
It's far from perfect and one day I might make a third iteration of Nines but I'm kinda proud of it for now. I'm definitely going to re-glue the wig with the correct glue when I get the chance as well as fixing the styling as well as improving the armband and making a skirt for a summer-friendly ver
Forgot to mention I tailored a black shirt to fit me too whoops.
But with that, Nines was done (enough) for MCM London October! It's day two of said event as I'm writing and fem Nines has been a hit so far. I met Bryan and Amelia and they loved it (year made right then).
But with that, Nines was done (enough) for MCM London October! It's day two of said event as I'm writing and fem Nines has been a hit so far. I met Bryan and Amelia and they loved it (year made right then).


October 25, 2025 at 9:20 PM
Forgot to mention I tailored a black shirt to fit me too whoops.
But with that, Nines was done (enough) for MCM London October! It's day two of said event as I'm writing and fem Nines has been a hit so far. I met Bryan and Amelia and they loved it (year made right then).
But with that, Nines was done (enough) for MCM London October! It's day two of said event as I'm writing and fem Nines has been a hit so far. I met Bryan and Amelia and they loved it (year made right then).
I glued the glued wefts onto the wig with hot glue (in lieu of uhu glue or similar) as well as the felt covered bottle cap (that I forgot to get a photo of) and trimmed the edges to make a semi-neutral hairline. I quickly made a blue scrunchie to cover the join and then trimmed and styled the bangs.


October 25, 2025 at 9:15 PM
I glued the glued wefts onto the wig with hot glue (in lieu of uhu glue or similar) as well as the felt covered bottle cap (that I forgot to get a photo of) and trimmed the edges to make a semi-neutral hairline. I quickly made a blue scrunchie to cover the join and then trimmed and styled the bangs.
Forgot to mention I added the top of a (CLEAN) bottle to have the ponytail be removable.
I glued wire onto the cap to support the structure before covering it in brown felt to have a better surface to glue the hairs to as well as making it so any gaps would be less visible.
I glued wire onto the cap to support the structure before covering it in brown felt to have a better surface to glue the hairs to as well as making it so any gaps would be less visible.


October 25, 2025 at 9:09 PM
Forgot to mention I added the top of a (CLEAN) bottle to have the ponytail be removable.
I glued wire onto the cap to support the structure before covering it in brown felt to have a better surface to glue the hairs to as well as making it so any gaps would be less visible.
I glued wire onto the cap to support the structure before covering it in brown felt to have a better surface to glue the hairs to as well as making it so any gaps would be less visible.
With the wig crimped, I separated out the bangs before cutting the rest off, making them into glued wefts (with what turns out to be the wrong type of glue) and gluing the cap into a hard helmet with hot glue.


October 25, 2025 at 9:02 PM
With the wig crimped, I separated out the bangs before cutting the rest off, making them into glued wefts (with what turns out to be the wrong type of glue) and gluing the cap into a hard helmet with hot glue.
After finishing the jacket I crimped the wig but procrastinated the rest by making the armband. I dissected a light up slap bracelet and glued on some glittery stretch knit (from my og nines cosplay) before adding a pvc panel with black electrical tape and reinserting the light into that pocket.


October 25, 2025 at 8:58 PM
After finishing the jacket I crimped the wig but procrastinated the rest by making the armband. I dissected a light up slap bracelet and glued on some glittery stretch knit (from my og nines cosplay) before adding a pvc panel with black electrical tape and reinserting the light into that pocket.
I sandwiched the lower hem in the waistband (I guess) with the little white square and hand stitched that to be hidden before doing the same with the front opening hem thing. I could have machine stitched it if I remembered to make the back a bit longer to stitch in the ditch but I simply forgot :/


October 25, 2025 at 8:51 PM
I sandwiched the lower hem in the waistband (I guess) with the little white square and hand stitched that to be hidden before doing the same with the front opening hem thing. I could have machine stitched it if I remembered to make the back a bit longer to stitch in the ditch but I simply forgot :/
To fix the fit I'd have to remake the entire thing, which I didn't have time for so I just ignored it and went ahead with adding the lining to the collar and sewing the light strip into the rim and bag lining the back lower hem to the lining before flatlining the front to it ready to be sandwiched.


October 25, 2025 at 8:48 PM
To fix the fit I'd have to remake the entire thing, which I didn't have time for so I just ignored it and went ahead with adding the lining to the collar and sewing the light strip into the rim and bag lining the back lower hem to the lining before flatlining the front to it ready to be sandwiched.
I got to sewing the arms onto the bodice and this is when I realised that I'd made a mistake when making the pattern. The polycotton mockups fit great, however I forgot to consider how much bulk the final fabric would add. I tried it on and the shoulders were too tight and sleeves slightly too short

October 25, 2025 at 8:43 PM
I got to sewing the arms onto the bodice and this is when I realised that I'd made a mistake when making the pattern. The polycotton mockups fit great, however I forgot to consider how much bulk the final fabric would add. I tried it on and the shoulders were too tight and sleeves slightly too short
Sewed the lining bodice together before adding two zips, one to each side seam to access the inside for the lights. One of the zips was an invisible one I had harvested from another cosplay a while back but the other was just a regular blue zip.


October 25, 2025 at 8:39 PM
Sewed the lining bodice together before adding two zips, one to each side seam to access the inside for the lights. One of the zips was an invisible one I had harvested from another cosplay a while back but the other was just a regular blue zip.
I sewed on the collar pleather by hand before hand basting the white collar (with sew in interfacing) and finishing it off with my machine.


October 25, 2025 at 8:33 PM
I sewed on the collar pleather by hand before hand basting the white collar (with sew in interfacing) and finishing it off with my machine.
Sewed the rest of the bodice panels together for a full back piece and two front pieces. I could now line up the htv on the white pieces and apply that too before sewing the front and backs together at the shoulders ready for the collar.


October 25, 2025 at 8:30 PM
Sewed the rest of the bodice panels together for a full back piece and two front pieces. I could now line up the htv on the white pieces and apply that too before sewing the front and backs together at the shoulders ready for the collar.
Cut a strip of blue organza on the bias and make a tube for the light strip to make it into piping almost, then hand sewed it to the top back panel to be sandwiched in the seam between it and the pleather panel when I handsewed that too (I dared not to even risk the machine damaging the light strip)


October 25, 2025 at 8:26 PM
Cut a strip of blue organza on the bias and make a tube for the light strip to make it into piping almost, then hand sewed it to the top back panel to be sandwiched in the seam between it and the pleather panel when I handsewed that too (I dared not to even risk the machine damaging the light strip)
Also added magnets in little pockets in the cuffs to close them! This worked well when they weren't being worn but it turns out they weren't quite strong enough to win against actual arm movement.

October 25, 2025 at 8:09 PM
Also added magnets in little pockets in the cuffs to close them! This worked well when they weren't being worn but it turns out they weren't quite strong enough to win against actual arm movement.
I did the sleeves in a stupid order but yk. Sewed the flap part of the sleeve to the lining before sewing the fashion and lining arms closed respectively, then turned it and sandwiched that part into the cuff. It's a bit longer than the sleeve so there's some overhang on the underside of the flap.


October 25, 2025 at 8:06 PM
I did the sleeves in a stupid order but yk. Sewed the flap part of the sleeve to the lining before sewing the fashion and lining arms closed respectively, then turned it and sandwiched that part into the cuff. It's a bit longer than the sleeve so there's some overhang on the underside of the flap.
I handsewed pockets for the light panels (I believe they're marketed to be glowing eyes for masks?) into the back also by only catching the inner fabric. I then stuck some reflective tape (made for lorries and stuff to reflect vehicle headlights) inside so that even with the lights off they "glowed"


October 25, 2025 at 7:53 PM
I handsewed pockets for the light panels (I believe they're marketed to be glowing eyes for masks?) into the back also by only catching the inner fabric. I then stuck some reflective tape (made for lorries and stuff to reflect vehicle headlights) inside so that even with the lights off they "glowed"
I punctured holes into the seam allowance of the pvc with a seam ripper before tacking it to the panels with tape. I handsewed the pvc so it only caught the inner fabric of the keyhole, leaving the outside without visible stitching.


October 25, 2025 at 7:49 PM
I punctured holes into the seam allowance of the pvc with a seam ripper before tacking it to the panels with tape. I handsewed the pvc so it only caught the inner fabric of the keyhole, leaving the outside without visible stitching.
Took the UV from a model of Nines and traced the writing digitally before I printed it out to the scale I need and cut all the glow in the dark htv by hand using a craft knife, thus any text smaller than the serial number didn't make it unfortunately. I only applied the parts on black at this time.


October 25, 2025 at 7:44 PM
Took the UV from a model of Nines and traced the writing digitally before I printed it out to the scale I need and cut all the glow in the dark htv by hand using a craft knife, thus any text smaller than the serial number didn't make it unfortunately. I only applied the parts on black at this time.
I made the triangular holographic effect by hand (since nowhere does triangular tesselation holographic vinyl smh) by cutting equilateral triangles by hand and hand placing them. I made sure they lined up ok with the keyholes but had to wait to attach them as I had yet to apply the vinyl.


October 25, 2025 at 7:28 PM
I made the triangular holographic effect by hand (since nowhere does triangular tesselation holographic vinyl smh) by cutting equilateral triangles by hand and hand placing them. I made sure they lined up ok with the keyholes but had to wait to attach them as I had yet to apply the vinyl.
Used my pattern to line up the triangles and to make sure the lights fit. Then sewed triangular keyhole cutouts with a tiny whip stitch around the seam because the fabric didn't hold a crisp seam from pressing alone.


October 25, 2025 at 7:24 PM
Used my pattern to line up the triangles and to make sure the lights fit. Then sewed triangular keyhole cutouts with a tiny whip stitch around the seam because the fabric didn't hold a crisp seam from pressing alone.
Unpicked a pleather skirt from a charity shop to use for the pleather and cut those pieces out, hand sewed little bits of white for the squares at the bottom of the opening, and sewed together the cuffs (part 1 of the mistakes with the sleeves 😔)


October 25, 2025 at 7:19 PM
Unpicked a pleather skirt from a charity shop to use for the pleather and cut those pieces out, hand sewed little bits of white for the squares at the bottom of the opening, and sewed together the cuffs (part 1 of the mistakes with the sleeves 😔)
Locked in too hard and forgot to post again whoopsie. Cut out all the fabrics and started sewing the bodice panels together. I didn't end up using the one pictured since I didn't like the center back seam as well as the darts.

October 25, 2025 at 7:16 PM
Locked in too hard and forgot to post again whoopsie. Cut out all the fabrics and started sewing the bodice panels together. I didn't end up using the one pictured since I didn't like the center back seam as well as the darts.
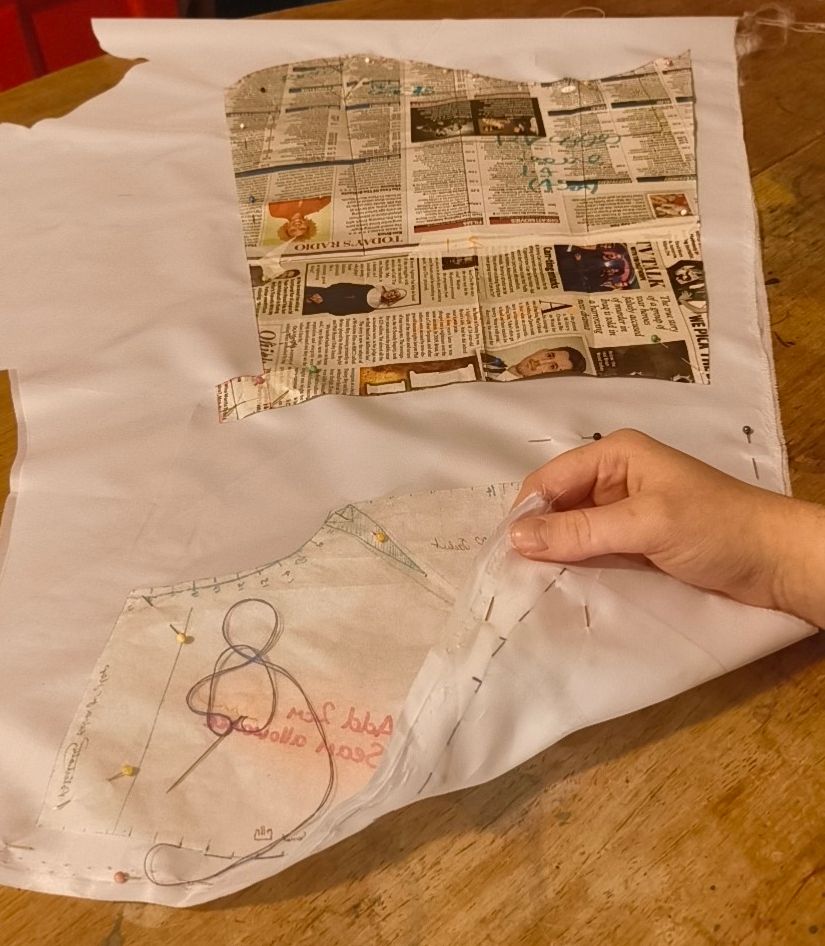
As the white outer fabric isn't opaque enough to not show the blue lining, I cut out a layer of thin white polyester lining (had to be the same fiber as the fashion so that it wouldn't be strange in ironing) to flatline to the outer fabric. Tacked these to help ensure everything is aligned later.

October 7, 2025 at 3:12 PM
As the white outer fabric isn't opaque enough to not show the blue lining, I cut out a layer of thin white polyester lining (had to be the same fiber as the fashion so that it wouldn't be strange in ironing) to flatline to the outer fabric. Tacked these to help ensure everything is aligned later.
Cut out the linings for the full pattern and sewed in the darts. I was really careful with this as polysatin is a pain with warping. Added a pleat on the back since blazer linings usually have one to accommodate movement (I think).


October 7, 2025 at 3:07 PM
Cut out the linings for the full pattern and sewed in the darts. I was really careful with this as polysatin is a pain with warping. Added a pleat on the back since blazer linings usually have one to accommodate movement (I think).
Cut to the first hunt where I got to watch the ghost beeline to the cupboard and kill the three of them in quick succession ✌️
#5YearsOfPhasmo
#5YearsOfPhasmo

September 16, 2025 at 6:17 PM
Cut to the first hunt where I got to watch the ghost beeline to the cupboard and kill the three of them in quick succession ✌️
#5YearsOfPhasmo
#5YearsOfPhasmo