


Gryphon Glassworks
@gryphonglassworks.bsky.social
Hi yall, I'm GryphonGlassworks, most notably known as the guy who makes the stained glass badges you see at some cons.
My full gallery can be found at itaku.ee/profile/gryphonglassworks/
My full gallery can be found at itaku.ee/profile/gryphonglassworks/
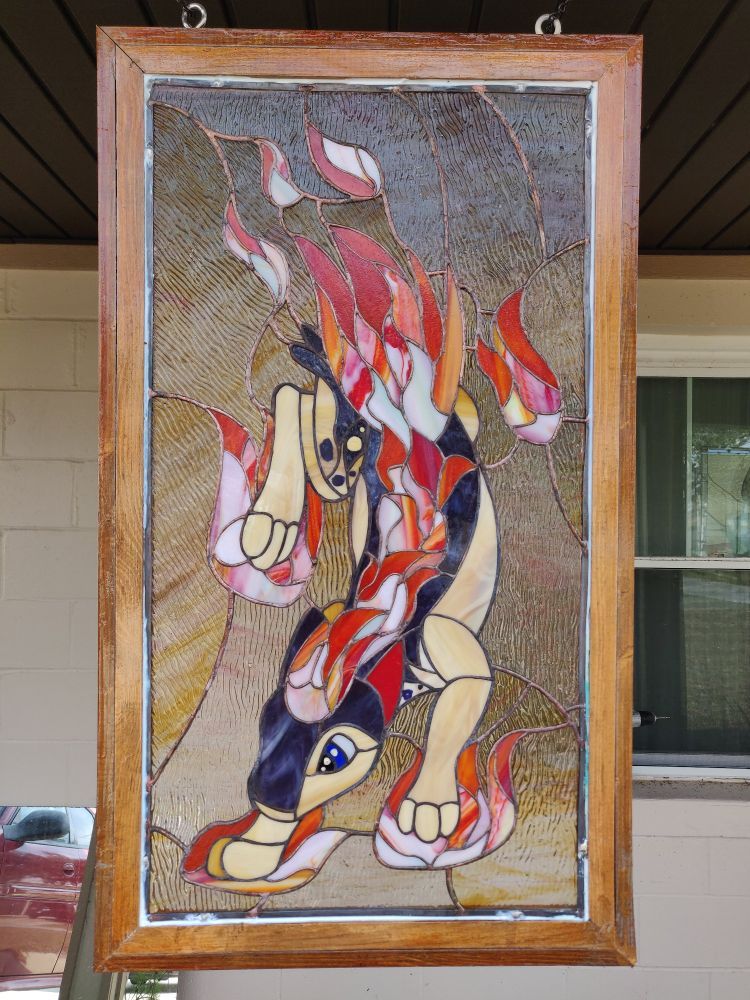
My latest piece, its Nyama the frost dragon. A friend! I did a trade with them for a VRC model~
One of the few times when I think silver serves best.
91 Pieces
10x13.5"
11.5 Hours.
One of the few times when I think silver serves best.
91 Pieces
10x13.5"
11.5 Hours.

July 9, 2025 at 7:10 PM
My latest piece, its Nyama the frost dragon. A friend! I did a trade with them for a VRC model~
One of the few times when I think silver serves best.
91 Pieces
10x13.5"
11.5 Hours.
One of the few times when I think silver serves best.
91 Pieces
10x13.5"
11.5 Hours.
If you're gonna vinyl cut it, at some point you have do it illustrator/inkscape to have the machine able to cut it. But you can sketch and mess with it wherever until then.
If you're gonna do paper templates and hand cut, you never need to touch it. You just need special template scissors
If you're gonna do paper templates and hand cut, you never need to touch it. You just need special template scissors


June 9, 2025 at 8:58 PM
If you're gonna vinyl cut it, at some point you have do it illustrator/inkscape to have the machine able to cut it. But you can sketch and mess with it wherever until then.
If you're gonna do paper templates and hand cut, you never need to touch it. You just need special template scissors
If you're gonna do paper templates and hand cut, you never need to touch it. You just need special template scissors
Now all that's left is to clean it, hang it, and take pictures.
Or if you wanna be extra fancy, you can inset it into a wooden frame, for that extra touch.
Fin~
Or if you wanna be extra fancy, you can inset it into a wooden frame, for that extra touch.
Fin~
June 9, 2025 at 8:53 PM
Now all that's left is to clean it, hang it, and take pictures.
Or if you wanna be extra fancy, you can inset it into a wooden frame, for that extra touch.
Fin~
Or if you wanna be extra fancy, you can inset it into a wooden frame, for that extra touch.
Fin~
You might wonder how silver metal is turned into a nice black or copper color.
That's the final step. Clean off all that awful flux.
Spray or scrub (with gloves) copper or black patina onto the lead. This will change its color. If you go copper, you may want to seal it, do it doesn't tarnish.
That's the final step. Clean off all that awful flux.
Spray or scrub (with gloves) copper or black patina onto the lead. This will change its color. If you go copper, you may want to seal it, do it doesn't tarnish.


June 9, 2025 at 8:52 PM
You might wonder how silver metal is turned into a nice black or copper color.
That's the final step. Clean off all that awful flux.
Spray or scrub (with gloves) copper or black patina onto the lead. This will change its color. If you go copper, you may want to seal it, do it doesn't tarnish.
That's the final step. Clean off all that awful flux.
Spray or scrub (with gloves) copper or black patina onto the lead. This will change its color. If you go copper, you may want to seal it, do it doesn't tarnish.
Next we frame it. And square frames are done with zinc channel for stability.
Rounded frames are made with lead channel
And smaller pieces may actually be made with just a bead of solder on some foil.
Hanging wires are also attached in this stage.
Rounded frames are made with lead channel
And smaller pieces may actually be made with just a bead of solder on some foil.
Hanging wires are also attached in this stage.


June 9, 2025 at 8:51 PM
Next we frame it. And square frames are done with zinc channel for stability.
Rounded frames are made with lead channel
And smaller pieces may actually be made with just a bead of solder on some foil.
Hanging wires are also attached in this stage.
Rounded frames are made with lead channel
And smaller pieces may actually be made with just a bead of solder on some foil.
Hanging wires are also attached in this stage.
At this point, everything is ready to be soldered together. I use a Hakko FX-888D for this task.
Most tasks are done with 60/40 solid core solder.
Stained glass badges, which are going to be handled are made with lead free. The latter requires Preheating the glass to get a good bead.
Most tasks are done with 60/40 solid core solder.
Stained glass badges, which are going to be handled are made with lead free. The latter requires Preheating the glass to get a good bead.


June 9, 2025 at 8:50 PM
At this point, everything is ready to be soldered together. I use a Hakko FX-888D for this task.
Most tasks are done with 60/40 solid core solder.
Stained glass badges, which are going to be handled are made with lead free. The latter requires Preheating the glass to get a good bead.
Most tasks are done with 60/40 solid core solder.
Stained glass badges, which are going to be handled are made with lead free. The latter requires Preheating the glass to get a good bead.
Next, things diverge. There are 2 techniques, lead channel, which is what actual windows are made with, and another technique called copper foiling. I use this latter method.
Each of the pieces of glass are wrapped in an adhesive bit of copper foil on the edges and burnished to the glass.
Each of the pieces of glass are wrapped in an adhesive bit of copper foil on the edges and burnished to the glass.


June 9, 2025 at 8:49 PM
Next, things diverge. There are 2 techniques, lead channel, which is what actual windows are made with, and another technique called copper foiling. I use this latter method.
Each of the pieces of glass are wrapped in an adhesive bit of copper foil on the edges and burnished to the glass.
Each of the pieces of glass are wrapped in an adhesive bit of copper foil on the edges and burnished to the glass.
Next you grind everything into shape using a wet grinder. The vinyl serves as an excellent template here.
After it's used, you pull it off.
After it's used, you pull it off.


June 9, 2025 at 8:48 PM
Next you grind everything into shape using a wet grinder. The vinyl serves as an excellent template here.
After it's used, you pull it off.
After it's used, you pull it off.
So you break it all into shape and have this very loose look of what want. Some are just rough, and some are missing breaks because it's far to hard to get some curves without the next step.


June 9, 2025 at 8:05 PM
So you break it all into shape and have this very loose look of what want. Some are just rough, and some are missing breaks because it's far to hard to get some curves without the next step.
Then you take your vinyl pattern, stick it on the glass, and cut it. To cut it, you use a scoring wheel, and a combination of your hands, running pliers, and grozing pliers to break the or glass into shape. The back side of the scoring wheel can be used for tapping the glass to propagate cracks.


June 9, 2025 at 7:58 PM
Then you take your vinyl pattern, stick it on the glass, and cut it. To cut it, you use a scoring wheel, and a combination of your hands, running pliers, and grozing pliers to break the or glass into shape. The back side of the scoring wheel can be used for tapping the glass to propagate cracks.
Then comes glass selection. There's more to it than just color though. You need to think about:
- Color
- Opacity
- Pattern
All of these have to harmonize with each other and your vision. For example, you don't want the body colors to have different opacity or they'll feel disconnected.
- Color
- Opacity
- Pattern
All of these have to harmonize with each other and your vision. For example, you don't want the body colors to have different opacity or they'll feel disconnected.


June 9, 2025 at 7:55 PM
Then comes glass selection. There's more to it than just color though. You need to think about:
- Color
- Opacity
- Pattern
All of these have to harmonize with each other and your vision. For example, you don't want the body colors to have different opacity or they'll feel disconnected.
- Color
- Opacity
- Pattern
All of these have to harmonize with each other and your vision. For example, you don't want the body colors to have different opacity or they'll feel disconnected.
Next, once the pattern is finalized, I cut it out with a vinyl cutter. Recently I upgraded from a silhouette.
I'll stick these on the glass when time comes.
I'll stick these on the glass when time comes.


June 9, 2025 at 7:25 PM
Next, once the pattern is finalized, I cut it out with a vinyl cutter. Recently I upgraded from a silhouette.
I'll stick these on the glass when time comes.
I'll stick these on the glass when time comes.
First part, of course, is pattern design. I work with the client to come up with something they like.
Initially it's just a sketch, but then I piece it out in illustrator. Once I have the lines, I do a color check in clip with the paint bucket fill to make sure it looks right.
Initially it's just a sketch, but then I piece it out in illustrator. Once I have the lines, I do a color check in clip with the paint bucket fill to make sure it looks right.


June 9, 2025 at 7:10 PM
First part, of course, is pattern design. I work with the client to come up with something they like.
Initially it's just a sketch, but then I piece it out in illustrator. Once I have the lines, I do a color check in clip with the paint bucket fill to make sure it looks right.
Initially it's just a sketch, but then I piece it out in illustrator. Once I have the lines, I do a color check in clip with the paint bucket fill to make sure it looks right.
My latest stained glass, a goopy slime gator who lives in a bucket.
This is my brother's OC, and a bday gift for him that I gave at TFF~
This is my brother's OC, and a bday gift for him that I gave at TFF~

June 9, 2025 at 5:21 PM
My latest stained glass, a goopy slime gator who lives in a bucket.
This is my brother's OC, and a bday gift for him that I gave at TFF~
This is my brother's OC, and a bday gift for him that I gave at TFF~
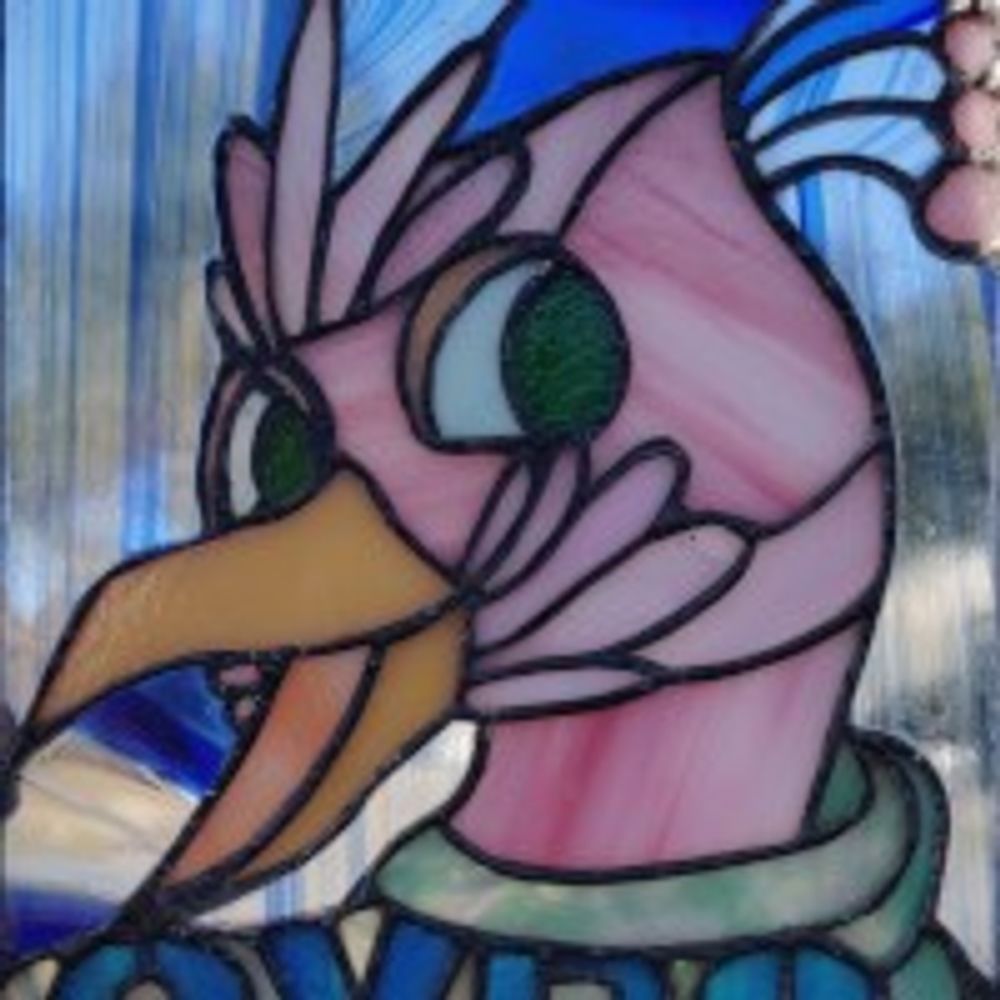
A kookaburra stained glass that I made for my hubby's Aunt and Uncle for Christmas.
With this, we've hit all the glass I've posted publicly. Only one new piece remains before we're caught up.
#StainedGlass
With this, we've hit all the glass I've posted publicly. Only one new piece remains before we're caught up.
#StainedGlass

May 22, 2025 at 5:36 PM
A kookaburra stained glass that I made for my hubby's Aunt and Uncle for Christmas.
With this, we've hit all the glass I've posted publicly. Only one new piece remains before we're caught up.
#StainedGlass
With this, we've hit all the glass I've posted publicly. Only one new piece remains before we're caught up.
#StainedGlass
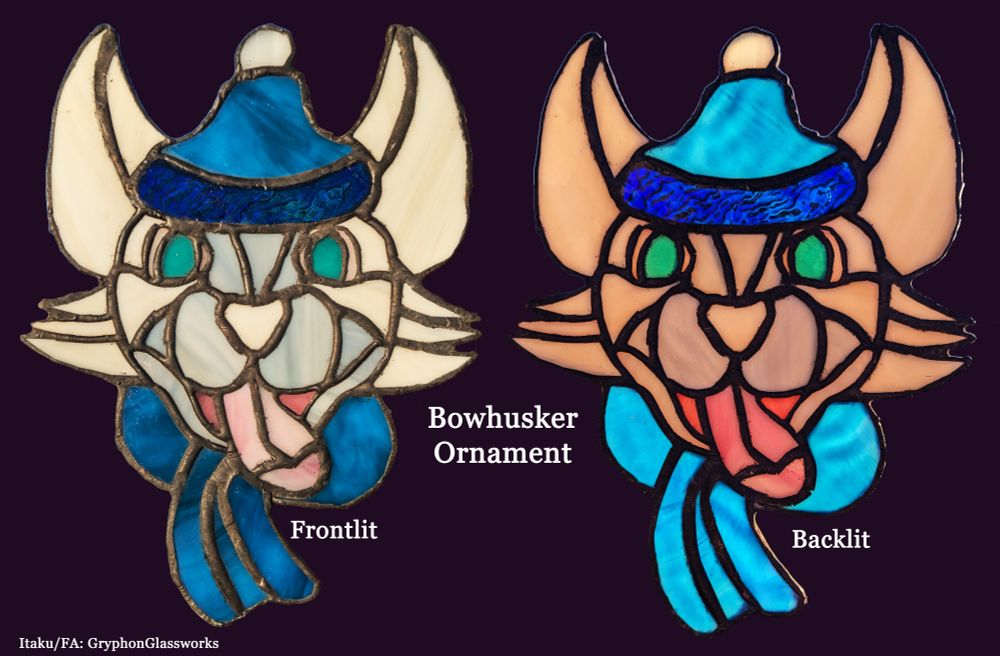
Stained glass secret santa gift, this one for @bowhuskers.bsky.social of their character in a hat and scarf~
#stainedglass #furry #furryart
#stainedglass #furry #furryart
May 21, 2025 at 2:30 PM
Stained glass secret santa gift, this one for @bowhuskers.bsky.social of their character in a hat and scarf~
#stainedglass #furry #furryart
#stainedglass #furry #furryart
So for secret santa this past Christmas, I made a smallish stained glass panel of my friend @arrox.bsky.social 's Goia. I tried to do it in monster hunter style, just for extra fun.
#stainedglass #furry #furryart
#stainedglass #furry #furryart

May 20, 2025 at 2:42 PM
So for secret santa this past Christmas, I made a smallish stained glass panel of my friend @arrox.bsky.social 's Goia. I tried to do it in monster hunter style, just for extra fun.
#stainedglass #furry #furryart
#stainedglass #furry #furryart
The second stained glass badge that was commissioned from my friend Der, of his avali.
Speaking of, once I finish catching up on all my glass, I have something fun that Der made for me~
#StainedGlass #Furry #FurryArt
Speaking of, once I finish catching up on all my glass, I have something fun that Der made for me~
#StainedGlass #Furry #FurryArt

May 19, 2025 at 2:56 PM
The second stained glass badge that was commissioned from my friend Der, of his avali.
Speaking of, once I finish catching up on all my glass, I have something fun that Der made for me~
#StainedGlass #Furry #FurryArt
Speaking of, once I finish catching up on all my glass, I have something fun that Der made for me~
#StainedGlass #Furry #FurryArt
Another stained glass badge, this time featuring my friend's gryphon Der. Thanks again for this commission. I did enjoy doing this.
#stainedglass #furry #furryart
#stainedglass #furry #furryart

May 16, 2025 at 2:04 PM
Another stained glass badge, this time featuring my friend's gryphon Der. Thanks again for this commission. I did enjoy doing this.
#stainedglass #furry #furryart
#stainedglass #furry #furryart
Here's a few side views of the box.

May 15, 2025 at 3:26 PM
Here's a few side views of the box.
This one is a funny one. A friend wanted a really nerdy stained glass for their workplace. So here's an Ethernet termination. This one's neat because there's actually a 3d box on top of the cables themselves. My first 3d piece.
#stainedglass
#stainedglass

May 15, 2025 at 3:22 PM
This one is a funny one. A friend wanted a really nerdy stained glass for their workplace. So here's an Ethernet termination. This one's neat because there's actually a 3d box on top of the cables themselves. My first 3d piece.
#stainedglass
#stainedglass
This stained glass badge I did as a part of a trade with
@buizel.cc last year to get an absolutly gorgeous Thunk Avatar, that I use all the time when streaming.
#stainedGlass #pokemon #pokemonart #buizel #furry #furryart
@buizel.cc last year to get an absolutly gorgeous Thunk Avatar, that I use all the time when streaming.
#stainedGlass #pokemon #pokemonart #buizel #furry #furryart

May 14, 2025 at 3:46 PM
This stained glass badge I did as a part of a trade with
@buizel.cc last year to get an absolutly gorgeous Thunk Avatar, that I use all the time when streaming.
#stainedGlass #pokemon #pokemonart #buizel #furry #furryart
@buizel.cc last year to get an absolutly gorgeous Thunk Avatar, that I use all the time when streaming.
#stainedGlass #pokemon #pokemonart #buizel #furry #furryart
For my hubby's birthday last year I made another stained glass badge, this one of his otter
#stainedglass #furryart
#stainedglass #furryart

May 13, 2025 at 3:14 PM
For my hubby's birthday last year I made another stained glass badge, this one of his otter
#stainedglass #furryart
#stainedglass #furryart
For secret Santa in 2023, I made a stained glass salazzle for someone in the pokemon workshop discord.
#stainedglass
#pokemonart
#furryart
#stainedglass
#pokemonart
#furryart

May 12, 2025 at 8:10 PM
For secret Santa in 2023, I made a stained glass salazzle for someone in the pokemon workshop discord.
#stainedglass
#pokemonart
#furryart
#stainedglass
#pokemonart
#furryart
My latest personal stained glass badge that I've made, My cramorant, Thunk. Though I guess its been about 2 years at this point.
#stainedglass #pokemon #pokemonart #cramorant #furry #furryart
#stainedglass #pokemon #pokemonart #cramorant #furry #furryart

May 8, 2025 at 2:14 PM
My latest personal stained glass badge that I've made, My cramorant, Thunk. Though I guess its been about 2 years at this point.
#stainedglass #pokemon #pokemonart #cramorant #furry #furryart
#stainedglass #pokemon #pokemonart #cramorant #furry #furryart